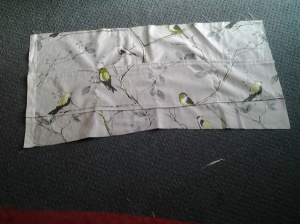
Remember my lovely curtains. Well, they got me lots of compliments but I think it was more down to the fabric I choose rather than my sewing skills (after all a curtain is just a rectangle of fabric with hooks).
But it got me thinking about what to do with the leftovers (I’d got extra to ensure pattern matching) and I realised that they wanted to be a bag. (This is not unsurprising, I like utilatarian sewing in general and bags in particular and the curtain fabric was the perfect weight for a nice strong bag).
I loosley based the bag on one I already had (which was another present bought for me from Skye Batiks but they don’t seem to make that style anymore). It’s large, with pockets inside and out, strong, well made and beautiful. Quite hard to live up to then!
I was feeling inspired and made it up in a Sunday afternoon when the kids were running around. I made it up as I went along and not all the edges are as straight as they might be. I started off hemming the top of a strip to be pockets around the outside. Then I sewed it on to the main piece along the bottom and added vertical seams (with ‘T’ bars at the top for strength) to divide 7it into 4 pockets, two for each side.
Then I sewed the sides and base together. I tried out the overlocking foot on my new machine which enables you to sew right along the raw edges with a zig zag in a passable imitation of an overlocker (serger). Next I mitred the corners to add depth to the bag. This put the pockets along the bottom of each side. I anchored my triangles to the bottom seam, thinking they might add a little strength to the base of the bag.
I hadn’t thought that as my pockets are the width of the bag, once it was mitred they now run round the corner at one edge and finish on the bag side, but it works ok.
Then I made a lining from the same lining fabric as my curtains (I’d forgotten when I was buying curtain fabric that I didn’t need to order as much of the lining material as there was no pattern matching, so I might as well use it). I made the lining the same way as the main bag just slightly narrower (~1/4″) than the main fabric and with one small patch pocket on one side and a larger patch pocket on the other.
I had a wide narrow piece of bird fabric left that was perfect to be a wide shoulder strap (good for spreading the weight of the contents of the bag). I added a mobile phone sized patch pocket towards one end and lined it with the lining fabric and topstitched along the long sides. Then I attached it to the main bag fabric at each side, with 2 or 3 rows of stitching for added strength (as where the handle is attached is often the first place to go on bags), and finished the raw edges.
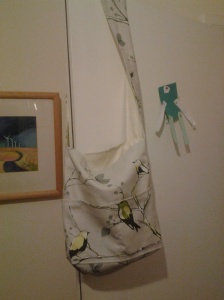
After completely mucking up the topology and sewing it togehter with the lining inside out and the handle trapped inside a bit of trial and error, I worked out that I could join the pieces neatly by starting with the main fabric bag inside out and the handle folded in where it was joined on and pushed down to the bottom seam, then the lining, also inside out, was placed inside it (so the right sides were together) and pinned into place. Then I sewed two lines of stitching, one along the top of each side, to join the two pieces together (leaving spaces at the handles) and turned the bag the right way out through one of the spaces where the handles were (this wouldn’t work with narrow handles). To finish I topstitched along each side and slipstitched the lining around the handles by hand. It’s my neatest bag ever, well, lining to main fabric wise (don’t take a set square to the pockets) and I was pretty pleased. Unfortunately I was concentrating so much I forgot to photograph how I did it. Wanna see how it came out?
Not bad, if I say so myself. Then I had to decide who it was for. After some thought I realised it was for a friend who moved abroad and has two small children a similar age to mine and therefore a lot of stuff to carry around like me and who would almost certainly would benefit from a treat for her self.
Then I realised that I could make another purse too. I didn’t bother with interfacing this time as the curtain fabric was pretty stiff. I shortened my pattern piece slightly, but I reckon it could be a bit shorter still. I also re read Lauren’s instructions and discovered my pattern was supposed to slope inwards slightly, so I ammended that too. I wonder what else I’ve done wrong with this pattern!
The making went slightly easier this time, I even glued the second side before the first was completely dry 
Although it needed regluing before sending, whoops.
I got the bird nicely aligned though.
Here’s the inside of the bag. And here are the two sugar mice I found to stop her boys from getting too jealous. (It was putting them, wrapped in bubble wrap, in the purse, that made it burst and need regluing.)
Well, I’m glad to report that she was pleased, although the boys tried to claim the clippy clasped purse. And I was delighted and surprised to recieve a knitting needle case in return. Making one has been on my to do list for a while. Now I’ve no excuse not to sort my needles out!
There were some extra presents too. The case is lined with yellow fabric and the needle pockets are graduated in height.
The main fabric is green with embroidery and mirrors on. I think it’s upcycled but no idea what from.
And it rolls up and ties shut. I’m very pleased with my lovely surprise! If I’d ever got round to making one (currently my needles are rattling arou d in a cardboard tube that a bottle of whiskey came in) I would never have used such exciting fabric. Thank you D!


lovely – great work!
blanca
Thank you Blanca
Pingback: Prolific Project Starter | Presido Purse no 2/1 aka Blue Birthday Bag