I’ve been spending a fair bit of time reading sewing blogs and day-dreaming about sewing recently and looks like it actually paid off, because I made TWO pairs of shorts. OK, so they’re not going to win any prizes, but it’s definitely good for my karma to complete things, they’re useful and the kids like them.
Beth’s blog that I’ve been reading, http://bethbeingcrafty.blogspot.co.uk
, features a fair bit of upcycling or refashioning of unwanted or unloved clothes into new garments. This seems to work particularly well with adults clothes to children’s as you start bigger and go smaller (I can’t seem to find a way to phrase this point without sounding like an idiot, but I’m confident that you’ll understand).
So, with the start of a new school year looming close and both kids needing blue shorts for PE (gym class), I thought of these…
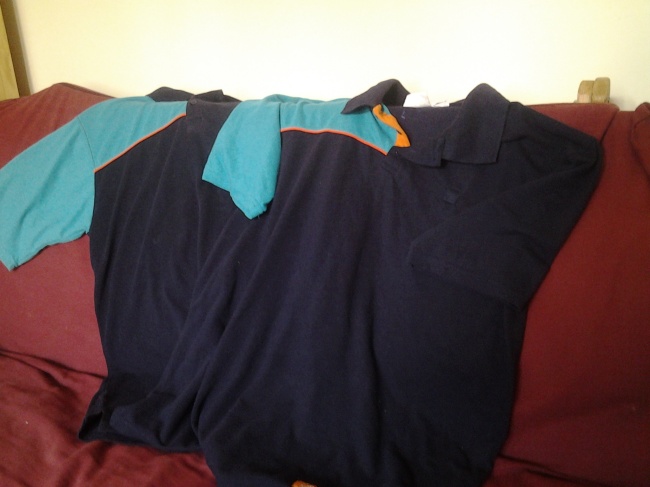
Two large dark blue polo shirts, uniform from an obsolete shop, that I happen to have in my possession (I have even moved house with them, that’s how rubbish I am at throwing things away). Not having made anything knit before (except for a sweatshirt back in school), I was also inspired by a post that I read recently about knits not being that scary to sew and that you can even get away without a ballpoint needle and straight stitch, but I couldn’t remember where it was or find it again, whoops. I’m pretty sure the fabric is knit, but it also has some kind of honey comb texture.
So, having decided on impulse to do this the day before school started back, I started looking for the tutorial on drafting your own shorts pattern from a pair of existing shorts that I’d read before. I couldn’t find that anywhere either, arghh, but I did find some nice clear instructions on drafting shorts by Maycie from blogspot www.maycieafterfive.com/2011/07/how-to-make-shorts.html (however since using them I can’t access the blog as it seems to have changed permissions).
So, I found a pair of the boys shorts that fit, turned one leg inside the other (which is all I remembered from the post saw before), found a big bit of paper and drafted me a pattern..
.
I liked the little split at the bottom of the side seams on the polo shirt and decided to use them in the shorts at the outside of the knees. I cut the pattern pieces so I would keep the polo shirt hem to be the short hem. Maycie’s shorts don’t have a side seam, rather they are cut on the fold (so there are two pieces, one is left front and back, the other right front and back), but this way the polo shirt side seam would be in the right place to make it look like I’d side seamed them and I got the split for free. I included seam allowance on the inside leg and crotch seams, and an inch plus seam allowance at the waistband as I would be folding the fabric over to make the waistband not using a separate piece.

Using the existing side seam and hem meant that I had to cut the sides straighter than the pattern of my original shorts which curves in at the top, but I figured that for this type of short it wouldn’t matter too much, the elastic at the waist would pull it in, and if I hated it I could always go back and take it in. But in the end I never felt the need to do that. If I was making them from 4 pieces of fabric and side seaming them I would have followed the shape.
Then I flipped the pattern to cut the other side, there was easily enough fabric.

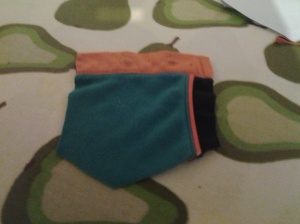
I wanted to add a patch pocket to the back as I hate not having a pocket in clothes and kids often need a tissue about them. I chose a patch pocket, because I’d need to unpick side seams to put in in seam pocket bags like the original shorts, plus patch pockets are much easier and also I wanted to use some of the turquoise to add a splash of colour. I drafted a pattern, folded the seam allowance under and checked it looked the right kind of size on the shorts I’d used to draft the pattern.

Rather than cut the pocket solid turquoise I wanted two use a two tone blue and turquoise pocket with the orange piping in between. (I’ve never sewn with piping and this was a cheating way to do it!) I’d have liked the turquoise at the top to make the opening contrast but there wasn’t enough fabric so turquoise at the bottom it was then.

I turned over my top seam allowance, right side to right side (i.e. the wrong way), pinned it and then sewed around my seam allowance line at the sides and bottom. Then I turned my top seam allowance back the right way (so the folded over piece was on the wrong side, with it’s edges all neat now), pressed and top sitched it. Then I pressed the side seams under along the sewed line, pinned the pocket on the (still flat) short piece and sewed it on, with triangles at the tops for added strength. Sewing over the double layer of piping was tough but the machine just about manage it.
Once I had the pocket on, I sped through making the shorts. There were basically only 3 things to do, crotch seams, inside leg seam and waistband. Having no side seams and no hem sped things up.

I wasn’t sure how to finish the crotch and inside leg seams, I don’t have an overlocker (serger), I didn’t fancy zig zagging it all but although the fabric didn’t seem to fray much I didn’t want to leave a raw edge. Then I remembered Rae from Made By Rae’s super seams, so that’s what I did and this time I can find the link!
www.made-by-rae.com/2013/06/super-seams which also explains brilliantly how to make shorts up (although not draft them) if you are confused. I finished the crotch seams off superseam#1 style before stitching the inside leg seam together. I used the same kind of superseam on the inside leg too (maybe I should have re read her blog before doing so as she uses a different technique here), I had to do it in 2 parts, from the bottom hem up to the crotch, as due to them now being short shape I couldn’t get all the way around
.
Now I just had the waistband to do, so I folded the seam allowance under and then folded the waistband down an inch and pressed it all and UH OH… I’d placed the pocket too high and couldn’t seam the waistband without sewing it shut. So, my next step was to unpick and resew pocket, right? Except that sounded like hard work. Then I had a brainwave, I would sew around all the waistband except the pocket and use the gap to put the elastic in and sew it shut on the inside by hand. It was a bit bigger gap than I would have chosen to leave for elastic, but it worked. The top of the pocket was only just on the inch thick waistband.
My first ever pair of shorts was made in in approximately an hour, including pattern drafting and cutting. The boy tried them on and was pleased. (I forgot to take a photo, I think it was about tea time at this point). The girl tried them on, at 18 months younger she’s shorter but about the same width and they fit fine, just a little longer. She wanted hers made exactly the same (so I got to use the same pattern and saved 10 minutes) but wanted to have her pocket at the front, which didn’t make a difference to the construction as the back and front are the same.
I liked the idea of having cutaway pockets, like jeans have, with the back of the pocket bag made out of the turquoise so that a quarter circle would show each side of the shorts (I had two turquoise sleeves to play with). Kind of like the pockets that Lauren from Guthrie-Ghani drafted for her own for a skirt here
http://www.guthrie-ghani.co.uk/blog/adding-pockets-to-a-skirt-drafting-your-own-pattern.
It seems to be my natural tendency to complicate things. But then I realised that jeans style pockets are put in during the construction of the side seam, which, I wasn’t planning on doing, so that would complicate things even more. So I sensibly took the easy route and stuck with a patch pocket.
I did want a contrast to the main blue colour at the top of the pocket though, so this time I unpicked the shirt buttons and cut the pocket a little differently…

Which meant my pocket top edge was already finished for me. The rest of the shorts were exactly the same but I took a bit more care placing the pocket this time and avoided the waistband issue. This time I did get a photo…

I like the contrast pocket top, but annoyingly you can see marks where the buttons were. Also I wanted the pocket on the right hand side, but I must have forgotten that she wants to wear the pocket at the front, not the back.
Oh well, she didn’t seem to mind. I’m glad I put the pockets on as the shorts are a bit shapeless and homemade looking, I think that’s at least partly down to making the waistband out of the main fabric and not adding a separate piece.
Still, 2 pairs of shorts made from scratch, plus the pair that I cut down from ragged trousers and another 2 pairs mended all within 24 hours isn’t bad going! I meant to take a photo of them wearing them, but I finished hers in the morning to check the elastic was the right size and we didn’t have time before we had to set off so I’ll have to wait until they come home for a wash at half term.