Snap!

I couldn’t resist picking up a metre of this marl grey drapey knit with a navy stripe when I was in my local fabric shop looking  for something else.

IMG_0038[1].JPG

Luckily I washed it straight away, cos then I got a bug, but it turned out that making a tried and tested Kristen Kimono T shirt with all my adjustments already made (FBA, sway back, extra length, all in the clear pocket where they should be just waiting for me)  was just the pick me up I needed when I was starting to feel better. I put a bit of effort into straight matching stripes, in an 80/20 kind of way (I still cut on the fold because I couldn’t be bothered to make new full size pattern pieces, but I did pin the navy stripes together when I folded the fabric to make sure they were level before placing my pattern pieces).

Then I realised I was basically remaking another t shirt I’d made 4 years previously!  And turns out I did a better job, check out my side seam comparisons! there’s a bit of improvement on the shoulder seam and neck finish too. Nice to see how far I’ve come.

IMG_0044[1].JPG

LSH’s opinion? This one looks cleaner than the old one! (By which I hope he means the grey is paler.)

IMG_0039[1]

Luckily for him I’d already made him enough circular scarves out the remnants to make him look like a ninja. They should keep his ears warm whilst cycling for while until the scarf gremlin eventually steals them all away to take back to thepr lair.

Messing about on the river

My son loves prints as much as he loves colours and it’s so hard to find boyish ones, or rather, not girly ones, so I tend to snatch them up when I stumble across them.

A while ago I bought this boat print, which is very lovely, but the long sleeved ADV T I made it into hasn’t got worn so much, on reflection the design is probably a bit young for him, or maybe just not his thing.

IMG_0086

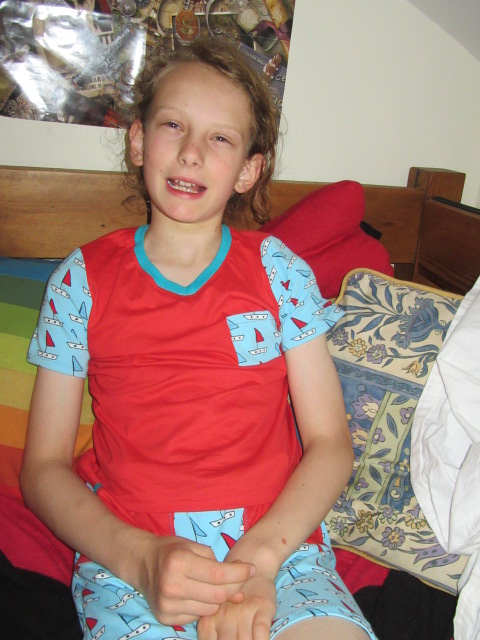
With the remnants of the long sleeve T I started making a short sleeved negative version shortly after this was finished. (I used turquoise ribbing for the neckband, the closest match I had, I didn’t want lots of bits of boats there!)

IMG_0084

I had to piece the back as I didn’t have enough red left and I foolishly decided to applique a boat on it whilst I was at it to match the print. It looked naff. My son loved it and wanted me to make it the front, which a) I didn’t want to do and b) would’ve been very complicated. So it languished in a pile for far too long, until I unearthed it in April when I joined in with the Sew Alongs and Sewing Contests UFO Purge.

IMG_0085.JPG

After a brief try at sprucing up the applique, in the end I just manged to re-piece the back out of red remnants so it was plain red. Phew. After that it was a quick finish.

I wasn’t sure how much it’d be worn though, however, there was a lot of the boat fabric left and still a little red, so I made up some matching Domi shorts to make a summer pj set.  I even retraced them in the next size up.

IMG_0114.JPG

Night Night!

Dandelion Tea

T shirts. A staple make for me, cos that’s what I wear day in day out, but I tend to make the same ones all the time, because I’ve adjusted the pattern for me and lets face it, how different can a t shirt be?

Then I saw the Chai t-shirt pattern by Liesl and Co, and not only do the pleats stand out, but the sleeves are different from the t-shirt patterns I have too, plus it has A/B, C and D cup size options, so I thought I might be able to get away with not doing a Full Bust Adjustment (FBA) and I decided to give it a go.

IMG_0019.JPG

Looking through my fabric to make a test one, I found this burgundy knit, with not much stretch, that I thought would do. I didn’t think there would be enough, so I pulled out a remnant of black jersey with a styilised dandelion print and thought I’d have to use it for the yokes and sleeves. In the end, I had enough to cut everything in the burgundy, but I had the idea in my head then so I cut the yokes and neckband in the dandelions.

Then one night whilst noodling on the internet I saw someone painting dandelions with a toilet roll tube. It looked so easy (this gives you the idea) and I thought, “I know, I’ll put a couple of dandelions onto the shirt front using some of my screenprint dye”.

IMG_0013.JPG

Needless to say it did not come out as well as the internet suggested it would. Luckily I tried it on a scrap bit of fabric. But LSH liked the seeds flying off that I’d done with the glue spreader.

So I tried again using my glue spreader, working lines around in a circle and then adding them inwards and that worked much better and I decided to go for it on my real fabric. (Obviously they didn’t come out quite as good as my test, but hey). Painting a flat piece of fabric that isn’t sewn up yet is definitely easier than painting a t shirt, a definite sewing perk.

So, after faffing around with printing the fabric and setting the dye, the t shirt came together really quickly. I attached the neckband my usual way rather than as the instructions.

The yokes and sleeves are size L, the main pieces are L graded to XL at the waist and the side seams are sewn in a slightly smaller seam allowance than the 1/2″ in the pattern because I was worried it would be a bit tight having had it over my head.  I chose the D cup. The fit is alright, but I think maybe I could use a little more room in the chest, the pleats hide what’s going on a little but I think there’s fabric pooling at the top due to it being a bit tight around my, err, chest apex.

So, as test garments go this is pretty wearable and I’m really chuffed with how the dandelions came out, it turns it from a “using up the oddments” garment into something special. Now to decide what to do next time, do I size up, or try and work out how to do an FBA on the front (which is a different shape to your average t shirt, cos pleats). Any thoughts on top tips?

When someone is having a rough time…

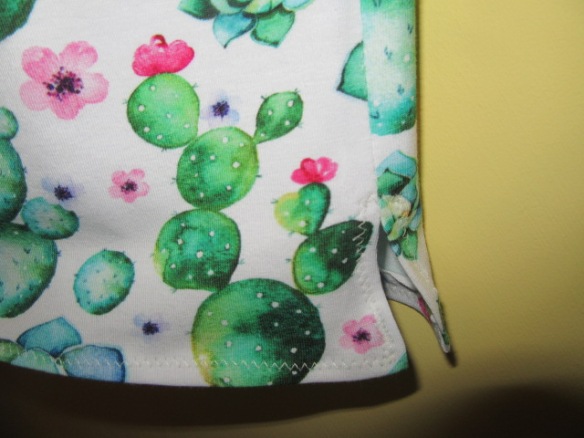
… what better way to go than to make them a Cactus T shirt?

IMG_0089

Kimono T-shirt pattern free from Maria Denmark

IMG_0092

With added length for the beanpole it’s made for

IMG_0090

beautiful fabric from Kitschy Coo, perfect for the succulent growing recipient.

IMG_0091

Much better than flowers, don’t you think?

IMG_0093

It’s winging its way to her as I type.

Generation Gap

It’s official, I am now an Old Fogey who doesn’t understand modern fashion. Namely, the trend of wearing leggings as outerwear. The Girl now prefers to wear leggings and t shirts to the dresses with leggings that she lived in for so long. Cue lots of arguments between me and The Girl about the need for her to cover her bum before she goes out.

IMG_0034

She does have a couple of long t shirts that I let her get away with, so I made her another one. This is an Adv Tee, age 11, with 4 1/2″ added length.

IMG_0037


I just extended the sides straight, so I put 4″ slits at the bottom for ease of movement.

IMG_0029

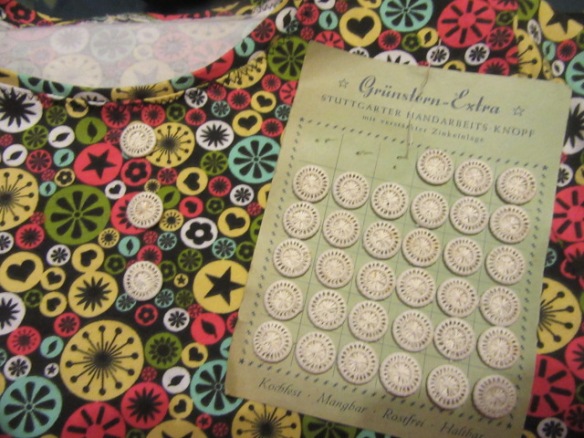
I changed the front neckline from a v neck to a round neck, just cutting it by eye. The neckband came out rather narrow, but I like it. And to show which is the front, I sewed on 3 of these handmade Stuttgart buttons that I got for Christmas from a lovely friend who lives in Germany.

IMG_0035.JPG

And look, decency is preserved. (Well kind of, it runs up a bit cos it’s quite a fitting t shirt).

IMG_0027

Speaking of bum coverage, I made a little something for myself out of the remnants.

Hello Goodbye

img_00951

This week the wonderful Jewel is hosting a pop up sew a long over on the Sew Alongs & Sewing Contests Facebook Page to encourage us to finish up some UFO’s (Un Finished Objects, aka abandoned projects). Her enthusiasm is infectious and my 3rd finished UFO this week is this Jalie 3132 .

img_00961

Scuse the wet hair, this was a rather rushed “while you’re on your way to work could you just take a pic of this” photo shoot this morning, the reason being so that I could take it with me to a coffee date to donate to a friend.

img_00971

This top is just too tight for my liking (see concertina effect on my inner elbow). Yes, I can wear it, but I don’t find it comfy or flattering and rather than keeping it in the hope it’ll fit better at some stage in the future, or to wear as a base layer, I’m liberating it so that it can find a forever home where it is loved and appreciated.

IMG_0085[2].JPG

I got this fabric about 2 and a half years ago on a tourist visit to Guthrie and Ghani thinking I’d make something for my then 6 year old with it, but when I got the pattern from Katrin in a CSC sewing swap I decided to use it for that instead. I got as far as tracing the pattern and doing a FBA but only cut out the back. The reason being that this fabric is thin and shifty and I was struggling to match the stripes up. Well, this week I commenced Operation Lower Your Standards and Get On With It and the top was duly cut out. The make itself was fairly straight forward, I even managed the binding on the V neck as per the instructions without any tears.

IMG_0087[1].JPG

With such a big gap between tracing the pattern and doing most of the cutting out and sewing up, I can’t really comment on if the sizing issue was my fault in choosing the wrong size, the pattern drafting, or my shape changing in the meantime. The pattern came together nicely and had a sensible amount of notches for matching up. It’s drafted with a 2″ hem, wider than the markings on my sewing machine, so I had to use masking tape to help me line it up for sewing! The sleeve is cut on the fold, which is slightly unusual and I must admit as someone used to asymmetric sleeves I’m a little skeptical that this is the best way to go. My main conclusion about this top is that pretty as it is, I don’t like working with this fabric. It’s a bit see through and not that fun to work with. However, I think it’s made up into a lovely top and I hope it gets lots of wear with my friend.

Hello Goodbye it is then.

M is for?

IMG_0182

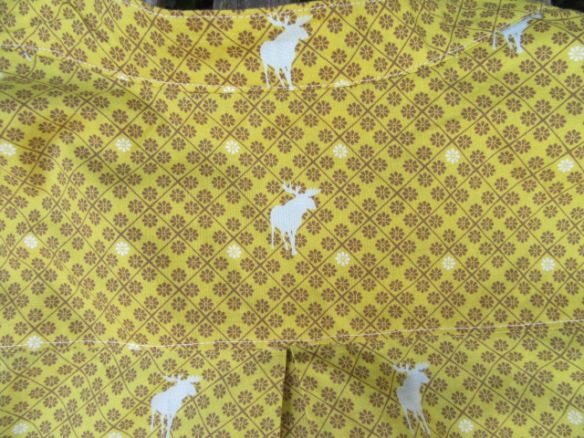
Mind the Moose Mila shirt, natch (with printed selvage edge made into a label).


IMG_0226

Stashbust? Check. Bought this last year on holiday in Wales (later found my local fabric shop stocks it too). Pretty much the whole 2m used.

IMG_0209

Seasonal Sewing Wardrobe Challenge? Check.

IMG_0206

Pattern? Itch to Sitch Mila shirt. So now I can be a total fan girl in this and my Liana jeans.

IMG_0188

Well drafted? Check, all lined up perfectly and you get to chose your upper chest in A, B, C, D or DD cups.

IMG_0196

Customer service? Excellent. When I got confused as to which size to choose someone suggested I ask Kennis on facebook and she looked at my measurements and suggested 12DD top graded to 18 a the waist and hips. Seams to have worked fine.

IMG_0192

Instructions: Excellent, and leads to to really professional finish. I had never inserted a partial placket before and it went swimmingly.

IMG_0185

Any deviation from said instructions? I wimped out on narrow curved hem and used satin bias binding instead.

IMG_0213

Pattern Alerations: As it was drafted for people up to 5’7″ and I’m 5’8″ and like things long, I added 1 1/2″ to the length. I probably didn’t need too.

IMG_0195

Sulkiest Machine Moment: Buttonholes. My machine, always fickle with buttonholes at best, decided to try and chew up the fabric. Eventually, I had a brainwave and unscrewed the throat plate and found a serious lint build up, eurghhh. I spent 15 minutes clearing it all out and after a wait while I made jeans, gave it a go, and it was much better. I also worked out that I need to turn the stitch length down 3 notches for the last step of the buttonhole (when it stiches forward down the right hand side) in order for the two sides to match up.

Overall? Not the quickest make, but the finish is great and I have a sunny yellow shirt.

IMG_0186

Best pattern matching moment: Check out the moose down the placket and on the centre back of the collar.

Best comment: “with that label in it it looks like you bought it” LSH.

Fabric bought for the next one? You betcha (don’t tell the stashbusters, but I really don’t have much lightweight fabric in my stash).


A circus of Puffins

*Actually, the time before I made this t shirt was my first ever Full Bust Adjustment and I messed it up and fudged it. I wasn’t quite sure how to manage one on a kimono sleeve t shirt but according to a comment on Maria’s blog“you just cut off the sleeves, and then put them back on after the adjustment”. Righto. I think I did this right.

Next up, the back. I decided that as I’d gone to all that fuss with the front, maybe I should finally learn how to do a sway back adjustment on the front, using this tutorial from Kitschycoo, in for a penny, in for a pound, right?


So, more taping (does anyone actually tape the whole pdf together before starting to cut pattern pieces out?), chose where to do it (err, no lengthen/shorten line as per tutorial, so I chose a handily looking placed join in the taped together pieces), mark wedge to be taken out (in blue) scratch head, re-read tutorial, mark wedge the correct way around (in pink, I’m loosing 2cm height from the centre back here), trace top half of pattern (with seam allowance included trick), mark top part of wedge, rotate greaseproof tracing paper so that line is now at the bottom of wedge, trace bottom part of pattern. See, that wasn’t so bad was it?  And now there are two personalised pattern pieces and walking the side seams looks like the side seams are still about the same length. Brill.

A short panic about cutting into my precious fabric later (really I should use a fabric I don’t care about to test my fit, but all my jersey is precious), 4 seams (with clear elastic in the shoulder seams) later and I’m ready to try it on.

Not too shabby, the swayback has definitely helped reduce pooling in my lower back, it’s a little tight around my ever expanding waistline (no, no happy news here, just pies) and it’s far too long, as despite making this mistake last time, I cut the 4XL length with the L size.

IMG_3932

Just some finishing to do. Inspired by Dandelion Drift recent shoreline boatneck  post I use this variant of this technique to finish my sleeves and neckline in orange ribbing. Happy colours! (I cut the neckline ribbing at about 90% the length of my neckline).  This was a bit of a spur of the moment decision, I love the orange but had to trim my seam allowance to get the binding to work as instructed. The inside looks a bit messy but worst of all the sleeve hem is still flipping up in the pictures above. Arghh. Bane of my sewing with knits life.

IMG_3930

Then I hacked off some inches from the bottom and added a wider orange rib band (so the length ended up back to about where it was drafted, nice and long without being silly).

And the jobs a good un. And now I can wear puffins all day long! My daughter’s comment on it was “these two are talking to each other and this one is ignoring that one”…

Bank Holiday Outfit

Hello, hello, testing, testing, 1, 2, 3, anyone still there? I’m afraid this blog has got a bit rusty and out of use in the last few weeks as we have been here there and everywhere. However, I’m pleased to report a new outfit has been sewn and worn this past week. Hurrah. So I’m going to spray everything liberally with WD40 and see if I can get the cogs turning again, because I really want to show you all this one.

the shirt was a big hit with everyone we were camping with

the shirt was a big hit with everyone we were camping with

Way back when at the beginning of the summer, when we were camping in Wales, I stumbled across the excellent Wheeler Fabrics shop in Wales. Turned out that amongst it’s pretties there was a lot of fabric from the Organic Textile Company hiding away in their basement. Yes, I was in the sister company to the place where I bought some sweatshirt fabric and a bundle of other goodies online. Honestly, I had no idea we were camping so near to such a place!

Anyway, one* of the fabrics I bought was a metre of this welsh dragon print cotton. I didn’t like the look of it online, but once I saw it in the flesh I knew it would make an excellent shirt for The Boy. Especially as the “original” shirt that I made him is now getting a little on the short side.

So I rolled out Simplicity 4760 again. Turns out last time I cut the pattern pieces along the large size line (the choice is S/M/L), so I just added an entirely unscientific 3″ to the length (an average of my guesstimate of 2″ and The Man’s 4″), as the skull and cross bones one is still plenty wide enough on him (partly I think this is Big 4 Sizing and partly that The Boy is a beanpole).

The make was pretty uneventful except that I didn’t have enough fabric left to cut the facings. However, I did have some red linen trousers of mine that had got put on the mending pile and then left there because I’m really bad at mending when I realised that the entire seat was almost threadbare and could give way spectacularly at any time. I’d had a vague thought about hacking them into shorts for the boy. Better do that first then so I don’t use the wrong bit of fabric.

So, brief detour…

Trouser ends with crotch curves cut out

Trouser ends with crotch curves cut out

I wanted to reuse the existing hems. The trousers were wide legged so I thought there’d be enough space to fit the crotch in the bottom of the legs (I don’t think I could get away with this usually). So, I used some existing shorts of his to measure from the bottom of the trousers/shorts to the bottom of the waistband, added seam allowance, and cut them off. I fixed a small hole by putting a scrap behind and zig zagging over the top.

Then I used the Simplicity 4760 pants pattern to trace the front and back crotch curves and cut them out.

baggy trousers!

baggy trousers!

Then I sewed the pieces together and got him to try them on.

that should sort it out

that should sort it out

Hmm, they’d be fine as girls culottes, but unsurprisingly they’re too baggy at the hem for what I want. So I cut an unscientific wedge shape of each side (hopefully evenly), re sewed. Then I put a couple of pleats in before adding an elasticated waistband made form the dragon fabric.

hmm,  surely they arent supposed to look that curvy in the waistband?

hmm, surely they arent supposed to look that curvy in the waistband?

that's a bit better

a brief snip later and that’s a bit better

Oh, and I unpicked and reused the back pockets of the trousers. I did consider front pockets, but as I’m not sure how much wear and tear this old fabric will stand up to I decided I couldn’t be bothered.

So that was how I remade my trousers into shorts. Not sure if it’s was the “right” way of doing it, but it worked.

and a waistband

and a waistband

Anyway, where was I. Facings for the shirt. Now I don’t have a long enough piece of red linen left to cut them out! Grr. So I pieced some bits together, and used the inside, which was less faded and a better match for the red dragons. (Well, mainly I used the “wrong” side, 1/2 of one facing is accidentally a lighter red than the rest of them).

insides, not too shabby

insides, not too shabby

The make itself was quite straightforward. I missed off the yokes again (I can’t see what they add). I didn’t bother trying pattern matching (didn’t seem much point on this fabric even if I’d had enough, although I did get ubraided about this by the boy! However I like some of the multi leg beasts on the seams, they look a little Isle of Mann to me). I still got slightly confused with the collar, not sure I did it as well this time, but it’s functional. I used french seams throughout (even on the armholes) which I then topstitched down, I think this might be a faux flat felled seam? I also used red thread throughout (very brave, but I didn’t have green thread that matched) and put 2 pockets on (as it was as easy as one) and it took pretty much no time at all. (Hooray for getting better at sewing in the last two years.)

pocket and collar, upside down, because this photo won't upload if I turn it the rightway up #luddite

pocket and collar. Yes, this picture is upside down, because this photo won’t upload if I turn it the right way up #luddite

Oh, and I was finishing this sewing the morning we were going away. The Man was very patient with me. I then handstitched the inside of the collar down in the car. As I did this after I topstitched around the front facings/hem/underside of the collar in one go (no idea why, seemed a good idea at the time), I had a couple of messy bits I had to fudge, but the boy kindly told me they made it look homemade. Anyway, they’re on the inside where no-one will notice and I don’t think anything is going to unravel.

press stud / popper / snap fail

press stud / popper / snap fail

I didn’t have time for buttons, so I took my snaps and prym plier tool thingy that I got for my birthday. I only had enough of some navy blue ones, which was a shame as they don’t really match, but I decided The Boy would rather have it finished than matching (plus he doesn’t see colours like most of us do so its unlikely to bother him). Inserting snaps in a car on a motorway (in the passenger seat I hasten to add!). Hmm, maybe not my best idea. One is slightly off line and one is upside down (i.e. press stud facing outwards) so doesn’t do up. Luckily it’s the bottom one so he can still wear the shirt.

Anyway, the boy didn’t mind, he had the shirt on before the car journey was finished and it was much admired by everyone upon arrival at our destination (Shrewsbury Folk Festival).

The question is, does anyone reading this have any experience of trying to remove them? Will it ruin my fabric or is it doable? And is it worth buying a whole new pack of snaps just to replace half of one?

festival marquee’s make a good “bloggers wall”

Anyway ballsups mishaps or not this outfit is definitely a win. And a great souvinear of a lovely holiday. I have also decided to make it my Made Up Initiative pledge. Which is kind of the wrong way around as I pledged after it was finished, but as Karen is happy for people to donate and not make I’m sure she won’t mind! And I was away when the initiative was launched and I’m still catching up on all the blogs I follow. So my conscience is clear!

Right, enough burbling from me, hope you had a great summer and that your pledge sewing is coming along nicely if you’re taking part.

Toodle pip.

*Holiday fabric shopping comes under the heading Souvenir, and not Stash Acquisition, so is guilt free. Fact.

Stitch and Bitch

So, yesterday I invited my friend round for a chat. And she asked if she could bring some hand sewing (err, yes, of course). She was feeling a little under pressure to get a Tudor (under?)shirt ready for her 3 year old. She has until Friday (when she’ll be here) and there are a few small things like work, children etc that are eating into her sewing time. So I sat unpicking the sideseams on my Style Arc Top (Me Made May confirmed it for me, love the fabric, hate the top, so I’m going to rework it) while she was handstitching and we were chatting away and her toddler was exploring all the toys lying around our house.

Handsewing!  She is hardcore.

Handsewing! She is hardcore.

But then she got frustrated with her work as it didn’t match the one she was copying and I had to help a friend out. Before I knew it I was using this technique (thanks for the heads up Dr Monserratt) to pin out and trace pattern pieces, which helped her work out where she’d gone wrong. Also I introduced her to entirely unauthentic water soluble pens. Then with pattern pieces there in front of me, I had a rummage in my scrap fabric pile and found some good enough cotton (it should be linen really) and started my own one. Surely an extra white top is no bad thing when being worn outdoors by a 3 year old?

Working out where it all went wrong

Working out where it all went wrong

I constructed in on my sewing machine (shock horror) so it’s not really authentic. I used french seams, as I figured she could stitch them down by hand and they’d look like flat felled seams (which is what the reproduction garment she was copying seemed to have, I don’t know what the “proper” technique should be). This got interesting as there is not just a front and back piece but side gussets as well that come to a point under the arm. I left the hems raw for her to stitch by hand.

her version (not finished)

her version (not finished)

So, all in all, a nice half a day spent doing unexpected sewing and helping out a friend. And as a bonus, one of the “toys” her son chose to play with was my hoover, and he spent a long time cleaning my sofa and living room floor. Bonus!

(Oh and she also took a couple of items out of my bags of wardrobe clear out, so I had slightly less to carry to the charity shop and she got some new-to-her clothes, double win).

and my attempt (also unfinished

and my attempt (also unfinished

And then today, another friend came round with his son and I finished off the t shirt I was making him (junior) from the remnants of my son’s pajama’s.

Well, I couldn't leave this gorgeous fabric lying around when it could be worn could I?

Well, I couldn’t leave this gorgeous fabric lying around when it could be made up and worn could I?

He wasn’t as co-operative with the photo’s though!

The closest we got to a photoshoot

The closest we got to a photoshoot

So, anyone else joining in my Improptu Scrap Busting For Other Peoples Toddlers Week?