Snap!

I couldn’t resist picking up a metre of this marl grey drapey knit with a navy stripe when I was in my local fabric shop looking  for something else.

IMG_0038[1].JPG

Luckily I washed it straight away, cos then I got a bug, but it turned out that making a tried and tested Kristen Kimono T shirt with all my adjustments already made (FBA, sway back, extra length, all in the clear pocket where they should be just waiting for me)  was just the pick me up I needed when I was starting to feel better. I put a bit of effort into straight matching stripes, in an 80/20 kind of way (I still cut on the fold because I couldn’t be bothered to make new full size pattern pieces, but I did pin the navy stripes together when I folded the fabric to make sure they were level before placing my pattern pieces).

Then I realised I was basically remaking another t shirt I’d made 4 years previously!  And turns out I did a better job, check out my side seam comparisons! there’s a bit of improvement on the shoulder seam and neck finish too. Nice to see how far I’ve come.

IMG_0044[1].JPG

LSH’s opinion? This one looks cleaner than the old one! (By which I hope he means the grey is paler.)

IMG_0039[1]

Luckily for him I’d already made him enough circular scarves out the remnants to make him look like a ninja. They should keep his ears warm whilst cycling for while until the scarf gremlin eventually steals them all away to take back to thepr lair.

Pegasus PJ’s

There have been a lot of posts featuring my son recently so just to prove that I still have a daughter that I love very much, but don’t make as many items of clothing for as her tastes are more mainstream, here are some pj’s I made recently.

IMG_0205[1].JPG

The flannel was bought yonks ago at my brothers local fabric shop in Scotland, and either she’s grown massively since then or I underestimated what I needed, as there wasn’t any where near enough for a set of pj’s for her as I’d planned, only just enough for the bottoms.

IMG_0202[1].JPG

Luckily I found this jersey locally that matched one of the colours in the flannel just perfectly (its very important to The Girl that things match). I even managed a perfect V neck for once (and then immediately made a pigs ear of a different part of the neckband, but hey). I used this new to me technique and I will definitely be trying it again, I really think only dealing with a single layer of neckband at first helps (and check out the perfect black and white neckband in the video, wonder if I’d be brave enough to try that, it looks fab!).IMG_0204[1].JPG

To make it tie in further I thought I’d applique something onto the top from the scraps, the traditional Scotty Dog as a bit twee for my liking, so I racked my brains for something my Greek Myth loving daughter would like and came up with a Pegasus! I’m really pleased how this came out, all due to lots of interfacing, both on the flannel and proper jersey stuff on the back of the t shirt.

IMG_0206[1]

Turning out a trapper

My son doesn’t like his new coat as it hasn’t got a hood. I, on the other hand, having picked this one up cheap to replace a really chuffing espensive one that he lost on a school trip, am not prepared to buy him a new coat. So a hat it is then. And I had just the idea, I have a bag of offcuts of really nice quality fleece that someone was giving away and he has a craft book that shows you how to make a simple fleece hat, so I would help him make his own, this kind of thing, and then he might take better care of it, win win.


Except, The Boy, of course, had different idea’s, wanting a trapper hat like his dad’s. So I found this pattern, printed it out at 95% (to allow for the fact that it wasn’t lined in fake fur – the fleece is double sided), and made it up, topstitching the seams flat as I didn’t want to iron it. And it worked, but it was too big and fell off his head when he ran.


So, a few adjustments. Poppers to hold the front flap up. Reused bag bits to hold the ear flaps up out the way when not in use (or under his chin when down) and elastic at the back to keep it on his head (2 rows, the first wasn’t enough).


And voila, a hat that he loves (I think) and his sister hates (I’m pretty sure). Lets see how long he manages to keep it for…

IMG_0013[1].JPG

Oh and whilst I was at it I turned this small piece of navy/purple fleece into a band to wear under my cycle helmet, I think I might have accidentally made a coif! Or maybe I’ve made the crosscloth that goes under a coif, I only heard of them when I helped a friend make some clothes for tudor reinactment.

This is not a hoodie

So, not long after I last made The Boy some new jogging bottoms, I cut out some more in a warmer fabric.This was at some point before our heatwave summer started, and the pattern pieces sat the whole time in my sewing room.

IMG_0016[1]

Well, now the weather has turned colder, I finally sewed them up. (It was a warm up to making myself a hoodie for a Sew A Long, or possibly a prevarication, hence the title.)

IMG_0023[1]

According to the Kitschy Coo Website where I bought it “This striking fabric has a large scale houndstooth in black on a heather grey background in a blend of 67% cotton, 27% polyester, and 6% elastane in a width of 160cm, with a hefty (but not overly bulky!) weight of 290gsm. The fabric is smooth on the top side with a snuggly brushed back on the underside.” It definitely is snuggly on the back!

IMG_0017[1].JPG

The Boy chose the fabric himself, and I went from surprised at how subtle it was (there were geometric wolf heads on offer after all, I was sure he’d go for those) when I bought it, to slightly alarmed at how OTT it looked whilst I was making it up, to loving it once it’s made and thinking it looks really stylish.   The important thing though is that he’s happy with it, and has worn them several times already.

The fabric had shrunk slightly when washed and I struggled to cut the the pieces out of my 1m length. I decided to make sure the dominant lines went across at my seam allowances (although they do swap from grey to black) at the expense of the legs caming out ever so slightly short.

No problem, I put some black ribbing cuffs on.

I also reinforced the knees again with some of the scrap farbic, quilting it on the back along the horizontal lines of the print. Customer feedback is that I didn’t quite get the sweetspot on placement (they’re too low).


The Conneticut Beach Party Dress

Its been a while since I posted about any sewing, so I thought I should tell you a story about the dress I made recently. Is everyone sitting comfortably?  Good, then I’ll begin…

Image result for nani iro double gauze forest

Once upon a time, a few years ago, everyone in the sewing world seemed to be blogging about making double gauze dresses, like this one and Prolific Project Starter got swept along in the tide and bought some of that same Nana Iro Double Gauze and when it arrived all the way from Japan it was beautiful and she loved it and petted it and put it safely in the cupboard. Every now and again she would take it out and pet it again and consider what the Perfect Pattern was to make with it, but one pattern would have too many seam lines that would cut into the large pebbles and the next would be too tent like, so she would put the fabric back in the cupboard whilst she thought some more and she never actually got around to actually doing anything with it.


Then one day she saw that Kelly Hogaboom was running a sew a long for the Bootstrap fit and flare dress in double gauze including this lovely version in a similar sort of colour for someone with a similar sort of body shape and she thought “maybe this is the dress for me” and so she bought some test fabric (normal cotton fabric, not double gauze) and in a fit of enthusiasm she bought lots of turquoise bias binding for seam finishes and she bought the pattern and she started printing it out and some of it came out the wrong scale and the printer played up and she got distracted and the next thing you new it had been sitting in a pile in the sewing room for nearly two years a little while.

IMG_0031.JPG

Then in April there was a UFO sew a long on the Sew Along group and as part of that she was sorting through her fabric and UFO’s and found the “dress” (aka a pile of fabric) and the seeds of inspiration started to grow.


And in May she finally started it, starting out with reprinting the pattern, cutting the fabric, discovering some irritating white lines after she cut the fabric (which she had enough fabric to avoid if she’d seen them earlier) , sewing it up (which came together pretty easily as it’s actually fairly simple and the sew a long is great), binding the seams as she went, inserting her 3rd(?) ever invisible zipper (which went pretty well) and working out how to Hong Kong finish that too, frustrating herself by not quite lining things up and by the fabric puckering when she pressed it and then making herself get over it because it was a freaking test garment for pity’s sake.

IMG_0010.JPG

Soon she was excitingly trying it on and dreaming about how good the double gauze version was going to be (even if she wasn’t sure quite what she was going to do with two such similar dresses in her wardrobe).


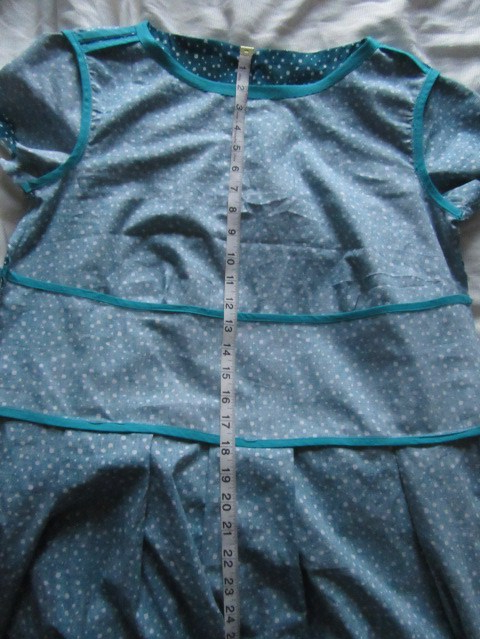
Then she sewed up the side seams and tried it on again only to find out that it DID NOT FIT. See, that horizontal panel is suppose to fit close to your body around your midrift and the gathers on the bodice are suppose to fit under your boobs, rather than framing your nipples and then the panel hanging down below empire line stylee.

Suffice to say that much pulling of hair and gnashing of teeth followed. This was not an easy fix, the entire front bodice needed to be longer, which meant it needed recutting, and even if she could work out what adjustments to make that would mean upicking all those beautifully finished seams and starting again. She really wasn’t sure that she could face it.

img_0013.jpg

But then again she really didn’t want to throw away all her hard work either. So after a bit of sulking and pouting she asked her friend, of a fairly similar but slightly smaller build, if she wanted a dress and lo and behold she did, and with a bit of adjusting (a pair of darts got added to the bodice/waist panel seam to take it in some more, and the side seams got taken in) it was finished and it fit.

And her friend declared it to be the perfect dress to pack when visiting her in laws in Connecticut and hanging out on posh beaches with them. Hurrah!

And so the dress wasn’t wasted. But then she thought on in and realised that it wasn’t wasted anyway because not only had she learnt new skills (Hong Kong seam finish), and practiced other skills (invisible zips) also the toile had done its job description of stopping her ruining her precious fabric, so rather than a failure it was a resounding success. Furthermore, seeing the dress  on her friend, she realised it was more her sort of thing than her own, whereupon she realised that the reason she couldn’t find the perfect dress pattern is that she didn’t actually wear dresses, so what she actually needed to do was make something else with her precious fabric that she might actually wear.

But that, dear reader, is a tale for another day (or quite possibly, at the speed she works, year, it’s currently draped over the banister waiting to be put away).

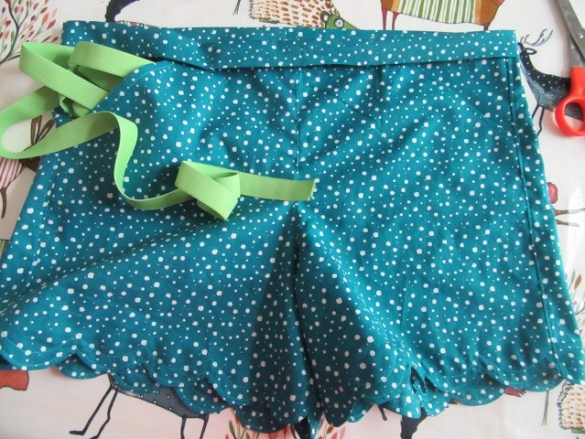
Also she did manage to make the leftovers into some City Gym Shorts part 4 for The Girl.

So, win win win win then.

All that remains is the mystery of how a dress that was drafted to fit her measurements (as all Bootstrap patterns are) came out so wrong.


We love trains

Behold, the Trains Pride T shirt…

IMG_0149.JPG

..the subtler, ironic and more colourful version of the Stonewall “Some people are trans get over it” t shirt.

Confused?  Take 2 minutes to read this article explaining it all, cos I’m not really qualified to explain, don’t worry, I’ll wait…

… all aboard now?

IMG_0153

Anyway, this one off was brought to you via the Thread Theory Strathcona T shirt Pattern, some lovely, quality knit fabric the staff at my Local Fabric Shop have finally persuaded their buyer it’s worth getting, and a lot of hard work from yours truly.

There isn’t a pocket with that t shirt design, so I self drafted one, and used a freezer paper stencil to apply the iconic British Rail logo.  (If you’re wondering why that freezer paper has writing all over it, I tried out a company that prints sewing patterns onto A0 and sends them through the post (because my local print shop is prohibitively expensive).  With my order they sent a piece of freezer paper with it advertising a new “Thermo (Iron on) Adhesive Pattern” service, which I cannibalised to make this stencil.)

I’m pretty pleased with how this came out (apart from the one glaring error that no-one who doesn’t sew will ever spot) and I’m glad I took the time to trace 2 pattern pieces for the sleeves too so that the stripes run across. (Yup, this t shirt had 10 pattern pieces, 3 each for the front and back, 2 for the sleeves, plus the neckband and the pocket. I drew the seam lines at the 1/3 points on the front and back pattern pieces and added seam allowances when I traced them. I measured how far below the armpit the seamline between the pale and dark green was and used that to figure out where to draw the matching seamline on my sleeve piece).

Now to post it off to my friend along with this bonus double sided circular scarf.

Messing about on the river

My son loves prints as much as he loves colours and it’s so hard to find boyish ones, or rather, not girly ones, so I tend to snatch them up when I stumble across them.

A while ago I bought this boat print, which is very lovely, but the long sleeved ADV T I made it into hasn’t got worn so much, on reflection the design is probably a bit young for him, or maybe just not his thing.

IMG_0086

With the remnants of the long sleeve T I started making a short sleeved negative version shortly after this was finished. (I used turquoise ribbing for the neckband, the closest match I had, I didn’t want lots of bits of boats there!)

IMG_0084

I had to piece the back as I didn’t have enough red left and I foolishly decided to applique a boat on it whilst I was at it to match the print. It looked naff. My son loved it and wanted me to make it the front, which a) I didn’t want to do and b) would’ve been very complicated. So it languished in a pile for far too long, until I unearthed it in April when I joined in with the Sew Alongs and Sewing Contests UFO Purge.

IMG_0085.JPG

After a brief try at sprucing up the applique, in the end I just manged to re-piece the back out of red remnants so it was plain red. Phew. After that it was a quick finish.

I wasn’t sure how much it’d be worn though, however, there was a lot of the boat fabric left and still a little red, so I made up some matching Domi shorts to make a summer pj set.  I even retraced them in the next size up.

IMG_0114.JPG

Night Night!

Another shorts hack

Anyone spot the deliberate error?  My short posts went 1, 2, 4  and that was not because I’m into doubling, but rather because I missed a pair out.  When we went looking for shorts inspiration last summer, whilst the Girls favourite were the scalloped hem ones, I rather liked these ones with a gathered hem and tulip pockets from Ottobre 03/2017.

They also didn’t go up to her size, so I hacked these too.

I used some red linen left over from trousers I made myself and I reckon I did a pretty good job, right?

I had the benefit of having the Ottobre pattern piece to hand and I used this when hacking the shorts. I started with the City Gym Shorts pattern again, which is the white paper on top, the pattern I ended up with is the brown underneath. This first pic is trying to show you that the crotch seams are the same on both patterns. Also there is a little extra wedge on the inseam at the front (left hand pic). I was following the lines of the Ottobre pattern.

Then I kind of swung the pattern out a bit so that the waistband line of the city gym shorts matched the angle of the waistband on the Ottobre ones and used the width of the City Gym Shorts waistband and traced down the side seam from there. This creates extra fullness which is then gathered in by sewing a casing and threading a drawstring through I was just kind of making it up as I went along. Also, like on the scalloped shorts I straightened the edge and lengthened them slightly. The extra length is to allow for the casing.

IMG_0070

As on the scalloped shorts, the order of construction needs changing around, sewing up the side seams first so that you have a nice flat surface to attach the pocket too. For the pocket I just used the template from the actual pattern. You cut two for each pocket, sew them right sides together leaving a gap, then turn them. The top zig zag portion is topstitched before they’re sewn on.  The elasticated waistband is just done like the City Gym shorts

City Gym Shorts part 4

So, after failing to make my daughter some scalloped edged shorts last year, this year I finally got around to it.  I traced the next size up of the City Gym pattern, cos whilst last years pairs still fit her, she does still keep growing and had pointed out to me herself that they wouldn’t fit forever. Whilst I was at it I added 2″ to the pattern length at the lengthen line (on both front and back pieces, obviously) and straightened the edges to lose the signature curve at the bottom. I also added pockets as before.

IMG_0077

Construction wise, I started with those front hip pockets, except this time around I sewed the opening right sides together before grading my seam allowance, understitching and topstitching, as I wasn’t using bias binding.

IMG_0076

Then I sewed the fronts to the backs along the side seam. I chose to use a 1/4″ seam allowance, like the pattern suggests for the crotch seam, and figures that way I didn’t have to add any extra seam allowance (when constructed as per instructions, that side seam is made by overlapping the bias bound front and back edges).  It was even narrower than my usual 1cm default. I finished by zig zagging with my overlocker foot on my sewing machine and topstitching the seam allowance down.

Next up I drafted a facing piece the width of the bottom of the short leg and about two inches deep and cut two of these out. Then I folded over the pattern piece paper doll style (after folding over the seam allowance) and cut out an arch.

That gave me a scallop template to trace onto my facing. I hemmed the other side of my facing before pining it to my shorts and stitching along the scalloped line. Then I trimmed, turned the facing and hand tacked everything in place so I could give it a good press.

IMG_0081

Finally I unpicked my tacking and topsitched the edge of the scallops. Then  I added a second line of scalloped stitching, mainly to hold the top of the facing in place as I wasn’t liking the other options I could think of to do that (either a straight line of machine stitching going across, or hand finishing on the inside). I’m rather pleased with how they turned out.

img_00821.jpg

After that the shorts finished up pretty quickly, sewing the crotch seams, inside leg and adding a waistband.


I’m pretty pleased with the result, which definitely has some growing room, and I don’t think you’d guess what pattern I’d used, they look so different from the original.  She is more reticent with her feedback, but as she’s wearing them the day after they’re finished I’m taking that as a win. She even was persuaded (just) to read standing up for a minute so that I could photograph them.


X marks the spot

IMG_0215

In a (quite possibly futile) effort to persuade my son that some of the trousers that I made him previously really are getting too short to wear now, I have made the Boy some new ones.

IMG_0125

This is a new to me pattern , Ottobre 01 /18, no33 Metsäretki sweatpants (jogging bottoms) with front and back pieces, inset front hip pockets, side patch pockets, no ribbing at the hem (unlike previous pairs I’ve made him) and no separate waistband.  Oh and they were supposed to have a mock fly, but I left that off and went with a straightforward front crotch seam cos I coudn’t be bothered.

IMG_0111.JPG

This metre of looped backed sweatshrt fabric (French terry?) had been in the stash a while and I just managed to squeeze the pattern pieces on, so I couldn’t really do much with pattern placement. Which means when he next goes up a size I’ll need over a metre of fabric to make him trousers. Eek.

IMG_0117.JPG

I was just putting some of the offcuts on one side to use to patch the knees later (he always wears them through in the knees and it’s nice to have matching fabric to fix them with) when I realised I could be a bit pre-emptive, and I quilted the a patch in place behind each knee to reinforce them.   My leftovers weren’t quite the width of the trouser front, but I extended the quilting lines right the way across.

The front hip pocket pieces were a bit of an unusual shape what with the included waistband, but after a bit of headscratching over the instructions I got there in the end.

IMG_0122.JPG

I made liberal use of the “coverstitch” on my (regular) machine in matching yellow thread, but it did stretch the top of the pocket and the pocket flap out a bit, so maybe I shouldn’t have used it there (or maybe I should invest in a walking foot). I left the snaps off the pockets as I couldn’t be bothered and they’re not really big enough to hold much anyhows.

In general he approves, but he says the side pockets aren’t big enough. Oh and I still haven’t go the old pair off him yet.