Carry on Cahoning (bag Part 2)

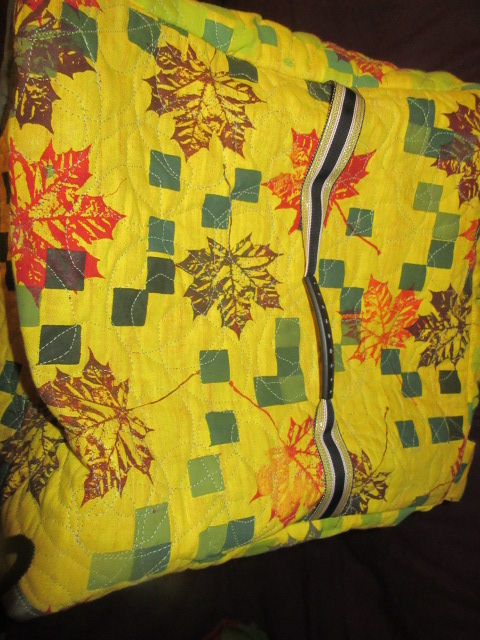
So, if you have a cahon that needs carrying and have prepped your fabric, next you need a plan, right?

IMG_0079

My orginal plan was quite literally back of the envelope. The zip down front, for easy cahon insertion and removal, rucksack straps and quilting all stayed. The pocket got ditched (the cahon is so bulky you really don’t want any extra sticky-outiness) as did the idea for a drawstring top and fold over flap. After much musing I decided that drawstring tops and zip down front are inherantly incompatible.

IMG_0085

My bag consists of a squarish base piece, a front piece, a main piece that wraps around the other 3 sides and a lid. After cutting my pieces to size, I sewed the zippers onto my front piece. These are separating zippers, because that was my only option locally, later I hand stitched just above the base to make them into non separating zippers.  The wrong side where the zipper is attached to the bag is is bound with some extra wide bias binding.

Next it was time to attach the other side of the zip to the main piece. As I happened to have the salvaged fabric from an abandoned broken tent lying around (as you do), I cut off some strips (already with one edge bound in black) and used them to make a facing for my zip to help keep the rain out that handily bind my raw edges at the same time.  I sewed the zip to the right side of my main piece (teeth pointing inwards), then flipped the fabric over and sewed the facing to the back (aligning the raw edges). Then I folded the zip so the teeth were now pointing outwards and my raw seam allowance was at the back, flipped my facing over my seam alowance, covering my zip, flipped back to the front side and topstitched everything into place. (Nope, I didn’t pin either. #sewingdangerously).

IMG_0098

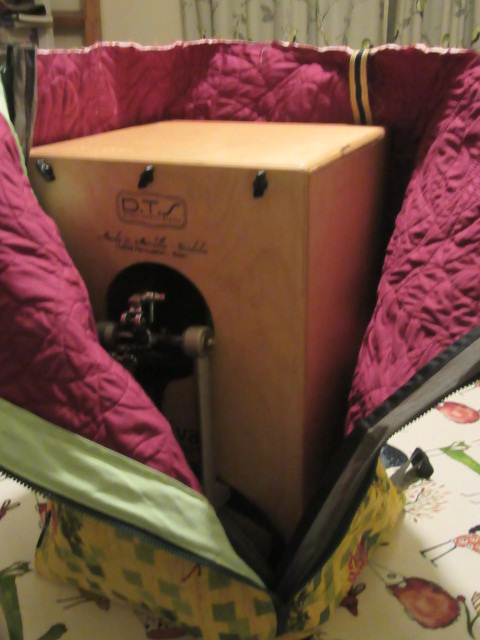
Then the front and main pieces were sewn to the base. The same pale green extra wide bias binding that you can see is also used to bind all the raw edges on the inside seams. There is also a flap of tent fabric at the bottom too, for extra weather proofness.  (Sorry, I have completely failed to take a decent photo of it, you’ll have to use your imagination).

Once the main bag was assembled, onto the straps. I wanted them quilted, to add padding, so rather than sew a tube and turn it, I pressed a centre fold into my strap piece, pressed the seam allowances, quilted some batting in place, attached the webbing to the bottom, folded it up and topstitched everything in place.

IMG_0175

Then I could baste the straps in place to try them out. At this point there is a grab handle in between them at the back, that later got moved. Oh, and I should mention that the bottom of the adjustable straps had already been sewn in place when the main piece was sewn tot he base. (And those sliders are reclaimed, all rucksacks die eventually and when mine do I salvage all those bits and put them in by Box of Useful Bag Bits. Those things are really expensive if you buy them new!).

IMG_0199

Last up the lid, which is sewn into place on three sides and then has a flap that goes over the front. It doesn’t need to lift off, as the whole front unzips. I used more tent salvage to bind the top of the front piece and the flap of the lid before sewing the lid in place.

The lid fastens in place with a magnetic bag clasp (this I did  buy new). I managed to get one part into the facing of the flap before sewing it down, (with a little rectangle of fleece offcut for extra stability), but for the bag front I attached it to a patch of denim and sewed it in place.  I didn’t fancy trying to get the clasp through the quilted front, and if I did I was worried that the holes would fray. (The patch has some classy red nail varnish acting as fray stop, which you can just make out around the clasp. Oh well.)

IMG_0201

The grab handle is some ribbon threaded through another reclaimed bag bit and sewn across the centre of the lid. I thought this would be more stable for lifting a bulky item like a cahon than a loop behind the straps on the back.

So now, finally, months after I started, LSH has a bag for his cahon. Woot woot. I will try and get you an action shot update once dance out season is underway.

Of course, as soon as a certain someone saw the cahon in its bag he had to put it on his back. I foolishly mentioned that it was nearly as big as him, and so he had to test it out.  He’s just slightly too big to have it zipped up.

Now this monumental project is finished I’m not sure what to do next. Something simple to clense my palate maybe.  In the meantime, I may just stare at it a little more….

Cahon Carrying – Part 1

“What is a cahon?” I hear you cry.   It’s a box that you sit on and drum with a hole on one side.

IMG_0042

A cahon can also double up nicely as a seat/table when camping. Can you spot it?

How do I know this? Cos last year Long Suffering Husband (LSH) bought one because even though I have manage to severely curb his string instrument purchases he is still addicted to buying instruments for Essential Morris Dancing Reasons (EMDR).

It flat packs, for easy carrying. I even found LSH a tote bag we already had to put it in (one made by yours truly way back when).

But life in our household is never that simple. Next up LSH acquired a foot pedal for said cahon (an essential accessory for all those who want to Drum ‘N Strum). And then he decided he needed to carry his amp around too. The amp will fit inside the cahon, but not in the bag alongside the cahon. So, the need for a specialist cahon bag was established. And that is when the fun started. ..

First up, the fabric. Good little stashbuster that I am, I suggested that I use a denim from my stash that I bought online yonks ago and never used, as when it came it wasn’t quite expected. One side is orange, one side is yellow, both quite in your face kind of shades. My thought was that the orange side would show the dirt less, but LSH preferred the yellow, because EMDR meant the ideal colour for the bag was green, and yellow was closer to that.

In the end I screen printed it, due to mental wincing at how much a light yellow bag would show up the dirt. First with green squares (the screen from the boys trousers), and then with leaves over the top (oak leaves would’ve been better, but the sycamore screen I had was deemed acceptable and suitable autumnal colours were approved).

Next up, high on my previous quilting success (and with the left over batting burning a hole in my stash, plus some left over burgndy polycotton, which was ok’d for the inside), I decided to quilt it. First the base (which I didn’t bother to screenprint cos it will hardly be on show much). It came out quite nicely, if I do say so myself, with a grid of inch squares mimicing the squares screen.

Then, I waxed it, to make it more weather proof. Thread Theory have blogged several times about Otter Wax. I was intrigued and this seemed the project to try it out on.  I couldn’t get Otter Wax in the UK so I used Greenland Wax instead, as it seemed to be very similar and surely Greenlanders must know a thing or two about making things water proof? The whole family had fun using a hairdryer to melt it into the fabric (we really know how to have fun in our house) and then dropping water on it to check out how well it worked. (That last pic, bottom right, shows the difference between untreated and treated fabric, impressive eh).

And then I tried to quilt much larger piece that would be the sides. Despite basting it in place all properly, it started slipping and my lines wouldn’t stay straight and Morris Dance Out Season (yes, there are seasons, like in Sportsing, they dtend to practice in the winter and inflict themselves on entertain the public in the summer months) was over, so it got Put On One Side.

Some time later, when LSH requested it be finished for his birthday, it got mentally moved up the To Do List When he started complaining about having to lug the cahon to and from practices dropping hints about Buying A Cahon Bag, I a) cursed him for fooling me into making one when you could buy one and b) resolved to finish this one so as to not have wasted all the effort so far. I didn’t quite manage it for his birthday, but close enough.

Anyway, for Quilting Attmept 2, with a fresh pair of eyes after several months break, I decided to ditch the regular squares, that made any deviation from the plan show up as a glaring mistake,  and instead adopted a more random approach, which I called “aim for the biggest gap” and that took the pressure off. I also took the executive decision to ignore any creases that had been sewn into the fabric. So don’t show this post to any Proper Quilters.  Finally, some shoulder aching time later it was done. Well, except for the bit when I realised I didn’t have enough fabric prepped for the top and had to print, wax and quilt another bit of cloth. Which, with practice under my belt and a smaller piece of fabric, came out much better, but left me resolved Never To Quilt Again.

Next up, an exciting How The Bag Was Made From the Painstakingly Prepared Fabric post. Bet your excited now, eh?

Winter Warmer

I’ve had some lovely organic cotton teal sweatshirt fabric sitting in my stash waiting to become a Jasper Dress for absolutely yonks because of THE FEAR. You know, the fear of wasting the perfect fabric and ruining the perfect pattern. So you do nothing.

Well, not quite nothing. First up I made up a shorter, collared version in some fleece and felt a bit meh about it. Meh about the slightly cheap farbic, meh about  the colour, meh about the fit. I wear it sometimes, cos I  have a serious jumper shortage.

IMG_0119.JPG

Then, before  Christmas, I made an impulse dress length version when I  had to have something red to wear to a choir event and I had some lovely red fleece stashed. But I didn’t quite have enough, so I ended up buying some black minky for the collar, cuffs, and hemband.

IMG_0134

I sized up this time, cos the last one is a bit tight, and then I ended up taking LOADS off the seams in places, cos it was a sack. It’s better now, but I’m still meh about the fitting. Plus, I don’t learn, fleece doesn’t behave like sweatshirt fabric, so it doesn’t really help me face my FEAR and make the “real deal up”.

IMG_0135

I think I didn’t blog it at the time because I’d lost my camera, and I’ve sort of lost track of what I did now. I know I left the pockets off, cos they fell in a really unflattering place last time, and then I have missed the pockets Every Single Time I’ve worn it since (especially as at this long length it renders the pockets in whatever jeans/skirt I’m wearing it with inaccessible). I also have failed to get a decent photograph of it ever since making it – maybe it’s a Secret Vampire Top?  In this shot you can almost see the large black button I used as I just happened to have it ligging about in my stash.

IMG_0067

So, thoughts on my big red “Santa Suit” (yup, it got called that by someone in my choir). On the plus side it’s warm, comfy, really warm, really comfy and kind of smart looking (by my standards at least).  Whereas on the down side I’m still not sure about the red/black colour combo (it skates too close to the classy/tacky line to me) and the fabric is so thick it’s not the most flattering garment (hence the Santa Suit comment I guess).  Very useful during the recent snowy weather we’ve been having though.

Maybe one day, I will face my fear and make the teal version up. I think partly that’s why I’m blogging this one – to try and galvanize myself into action. Anyone got any top tips on tackling The Fabric/Pattern Fear?


Shop Bought

Nope, I’ve not started blogging high st clothing, rather my daughter commented “it looks like you bought it in a shop, in a good way” when she got this dress recently for her birthday.  (Her caveat being the buttons on the bib, which I did in a rush. She has noticed they’re not both the same way up. Whoops.)

In actual fact its from Ottobre 01/17, no 32.

Unfortunately my braiding standard isn’t good enough to mimic these photo’s despite her having the hair for it!

IMG_0011.JPG

I missed off the mock fly at the front (I really couldn’t see the point), but I did flat fell the centre front and back seams (so I added more seam allowance here to account for that).

IMG_0018.JPG

The main fabric, some lovely buttery turquoise needle cord that I think I got in Glasgow with the girl in mind. There is a decent sized piece left too. Also, some fabric that came in a bundle used for pocket linings and pockets. It’s too pretty to be used for that really but I don’t know what else to do with it.

IMG_0044

Pattern alterations: I used these adjustable fastenings instead of putting a button hole on the bib and a couple of buttons on the strap. I lengthened the straps a little to allow for this – I really didn’t need too cos they ended up mahoosivley long. I also lined the straps, rather than turning the edges and heming cos I thought it would look neater.

The Girls circumfernece measurements generally come out at a larger size than her height. I’ve just been going with it, but she has been complaining about how ridiculously long the dresses I make her are. So this time, I cut the skirt portion to the length of her height size and now it’s ridiculously short. (My mum denied this was a dress, calling it instead an apron). Not helped by the fact that she’s shortened the straps as much as possible. Still, she is very happy with the length and this garment definitely ticks a box in the “leggings are not outerwear” solution chart.

IMG_0010

They have a whopping 4 pockets, two front and two back, and I nearly added one to the bib as well.

With a combination of rushing headfirst towards a hard deadline, and the Legendary Ottobre Minimalist Directions, I did end up changing the construction a little. The bib facing is faced with some bias binding I had on hand, as are the curved edges at the top of the back. Actually, with hindsight, I might just have lined the bib portions front and back in some of my funky cotton. And I kind of fudged the side seam around the pockets, don’t ask me what I did, but it seems ok!

Overall, this is definitely a win cos the girl seems happy to wear it. However, I’m a tad disappointed with the shapelessness of the top, it looks a bit sack like to me, definitely a better silhouette when she has her cardigan over it.  Possibly this is because this size dress is drafted with an older person in mind who might have more curves than my quite tall but definitely still 10 year old.


Politically Incorrect Lunch

I’ve just got back from having lunch two of my friends – a great opportunity to interrupt each other, swear and generally put the world to rights. Somehow one of my friends got talked into being Vegan for a month and for reasons that I’m not entirely sure of, that then meant I had to to make vegan brownies to bring for pudding.

IMG_0105.JPG

Which is why LSH found me “doing crazy things” aka starting to cook nut free vegan chocolate brownies at 11.30pm yesterday.  The nut free bit isn’t so easy to achieve in conjunction with the vegan bit, but a necessity for me cos of my over zealous immune system.

The brownies were a great success, this is the bit I took home, looking slightly the worse for wear after being chucked in my cycle pannier.

For my future reference, for my friend who liked them and for anyone else wanting to cook such a thing:

  • The nut and dairy free chocolate brownie recipe that I used for the base can be found here.
  • But I couldn’t get the link from that recipe to the flaxseed egg substitue that they used to work, so I used this one instead.  (My two top tips on this are flaxseeds are the same as linseeds, and they are near impervious to brute force, so buying ready powdered is a good idea. Apparently there is a similar thing you can do with chia seeds too and they don’t need crushing).
  • The “really, this has avocado in, I cannot taste it” lovely avocado fudgy topping came from  this recipe. It was actually the inspiration for the whole shebang, but the rest of the recipe was too nutty for me (I can’t eat coconut either, no idea if they’re technically a nut or not, my avoidance is purely based on experience not botanical definitions).
  • I sort of used the caramel sauce recipe from here.  Sort of as in I had about 1/6 soya milk the recipe called for (left over from when the Beast from the East stole all our milk and I panic bought soya milk and then had to figure out ways to use it, which turned out to be pancakes and soda bread), so I kind of winged the amounts rather than try and measure 1/30 cup  maple syrup. It came out a bit too thick to drizzle but was very tasty.

So there you have it. Perfect to have with your coffee on a sewing break.


A little screen time.

Today I’m having some fun printing, which is the next step needed for the Previously Abandoned Project that I have dug out and am trying to get finished this week.

IMG_0099.JPG

And I remembered that I never blogged the trousers that this print block was first used for.

Oh yes, I remember why that was now, a certain someone wasn’t really co-operating when I tried to photograph them!

IMG_0028.JPG

Anyway, I designed this screen myself (it came with a paper print out of the screen that nicely illustrates the deisgn) and got it made up at thermofax, the idea being to brighten up this fleece backed sweatshirting fabric leftover from a jumper that I made, so that it could be used for trousers for The Boy.

My original idea for this design was that the frame can be rotated each time and 4 copies of it tessellate to make a square – see left hand picture. It was supposed to look vaguely like minecraft blocks and I envisaged covering the fabric like this, which each finished 4×4 block being a rotation of the one next to it, making a fairly large repeat. However, registering prints is HARD and requires preparation and patience that quite frankly I don’t have. I found this screen particularly confusing to do use as intended, as it’s rectangular, a whole column of the final square is missing, so it makes it hard to work out how to line the second print up. Most of the time I ended up with something more like the right hand picture, in fact the left hand picture is probably the only time I actually got it to work as originally intended!

IMG_0032.JPG

So instead I went for a random look, starting at the bottom of the legs and then petering out as it went up.  I was really pleased how this effect turned out and it lets some of the green base fabric show through too.

IMG_0183.JPG

The pattern I used was the Ottobre/Sofilantjes mash up, and I put more of the design inside the pockets.

I realised today that I have only ever used this screen with green inks, and was merrily planning using it with some primary colours,  but then when I washed it afterwards the screen is starting to come apart, so if I want to do that I will have to order a replacement screen.  Still, I have a birthday coming up in a couple of months, so maybe a new screen or two would be in order, with a couple of pots of ink, I quite fancy some of the metallic ones.

Argh, Distracted Squirrel Brain strikes again. Must concentrate on finishing this project, and then some of the piles ligging about in my house before I start on something new!

Watch this space for more Previously Abandoned Project Updates soon, assuming I stay focused long enough.

Pale imitation

So, a couple of months ago I saw Kelly’s awesome skirted leggings and thought now there’s a solution to the Leggings Aren’t Outerwear disagreement The Girl and I have.

IMG_0014

So I made a pair and felt kind of meh about them so never got around to blogging them. (Yesterdays post reminded me cos the leftovers ended up in my new knickers).

On the advice of Kelly (she is a generous woman) I curved the skirt portions out a bit going down the side seam and made them lower at the centre than the sides. The side seam curve worked well but with hindsight the hemline is far too curvy.  (On the plus side, note my dots and crosses paper (1 inch grid) that came as packaging with something non sewing related orderd online. I have ironed it out and am repurposing it).

IMG_0018

The skirt hem is turned and zig zagged, which would’ve been easier with a less pronounced curve. And it has a tendancy to flip up in the middle – the resulting duck tail look is not a favourite of mine. I wonder if this is the curve, or the fabric (a nice jersey, but not anything as fancy as the Haci sweater knit that Kelly used).

IMG_0017

The skirt is then basted at the top to the leggings before adding some kind of hem band, or in my case, this rainbow elastic. I was pleased how neatly I sewed it on at the time (the blue and orange zig zags just melt into the background stripe colour as planned) but overall the look screams “Home made” in a “could do better” kind of way to me.

So yeah, without wishing to sound too negative, these fall firmly into the “room for improvement” category to me (the fit of the leggings isn’t that great either). However, The Girl does not seem to share my reservations and has been wearing them, and they do cover her bum, so maybe I will just need to make a new pair that fixes my grouches and puts these into the Wearable Muslin category.

Snow Days

We’ve had some rare weather for this part of the world this week, snow.  Which I just realised I have no photo’s of whatsoever cos I spent most of the time indoors, reading and occasionally cooking soup.  Whoops.

Image may contain: one or more people, tree and outdoor

Luckily school was open Thursday morning so an appearance by both Hester Shaw

Image may contain: 1 person, smiling, indoor

and Tiffany Aching could be made for world book day.  After that we mainly sat around reading and eating with the occasional trip outside (me less than the others as a certain young man requisitioned my wellies cos he’d left his at school. Oh the hardships one endures as a parent, in this case, staying inside warm and dry.) We were some of the lucky ones without power cuts, boiler failure or stuck in a car in a snowdrift. The worst hardship I had to endure was a day without tea due to a lack of milk available locally.

Today, however, I have come out of hibernation enough to use some scraps to make myself three new pairs of knickers, all matching and yet not matching, almost like a shop bought set.  There’s also a couple of more of the ubiquitous headbands/circular scarves/earwarmers.

IMG_0076.JPG

And now that the snow is pretty much all gone, it is being commemorated in biscuit form.  What more fitting a tribute?