Hoodie 2.0

(or Yay, I finally sewed something)

IMG_3865

First there was Hoodie 1.0, AKA the Hobbit Hoodie (short and fat).

IMG_4136

Then there was the beta (aka test) version of the What-No-Decent-Mens-Hoodie-Patterns?-Surely-Even-My-Drafting -Has-to-Fit-Better-Than-the-First-One Hoodie (known as the bike hoodie for short).

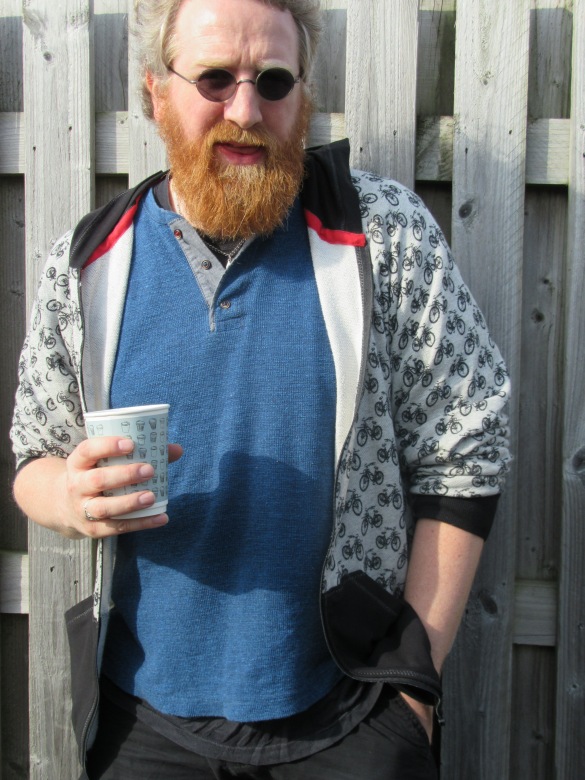
Now meet, Hoodie 2.0, the Vaguely Steampunk Cogs Hoodie (in teal).

This is basically the same pattern as the Bike Hoodie (i.e. self drafted raglan with hood and pockets from a free Lekala pattern) with a few very technical and highly skilled fitting tweaks. (Bear with me here while I describe these for fellow pro’s and don’t worry too much if you find my description too indecipherable, you probably just don’t have my amazing fitting skills, so just nod in awe instead.) I took a thumbs length out of the underarm sleeve, tapering it down to the nothing at the cuff seam and I took half a thumb out of the middle of the raglan seam tapering to nothing at either end of the seam. Oh and I redrew the side seam so it was actually straight and perpendicular to the hem. I know, I know, technical stuff.

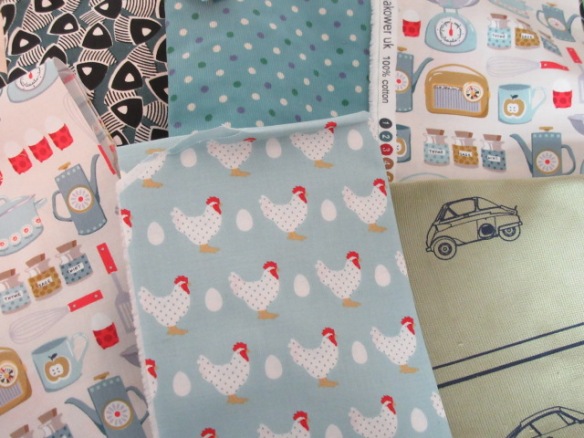
My other change was to line the hood. Which I did by underlining, as I wanted to keep the main fabric folded over to the inside and I wasn’t sure how else to achieve this didn’t want to show anyone up any more by redrafting the pieces to make that happen.  Basically I cut out and sewed 2 hood pieces, one in my main fabric and one in leftover fabric from my stash (my initial thought was to buy something, quite pleased I double checked I really needed to, not least as this stuff feels very soft and warm). Then I tacked (basted) them together. Then I folded the front edge over and pressed in place. Oh and I wanted to use twill tape to thread through the channel but as last time I had trouble getting safety pins through my eyelets I tacked this into the crease of the foldover before sewing my edges down (so it wouldn’t shift and get caught in the stitching), crossed my fingers and by jove it worked, when I unpicked my tacking I had succesfully sewn my drawstring into the casing but left it free to move. Less haste more speed and all that.  Oh and I used the same twill tape to cover the hood/hoodie seam and to make a hanging loop (always useful).

Finished last night, roadtested on a family day out today, thumbs up, made me smile lots and hubby seemed to like it too. The fit is definitely better again (although as always there is room for improvement) and I wish I’d cut the inerfacing tape I used to stabilise the front with in half as due to my narrow seam allowance it shows. But as Points To Improve On go, that’s pretty minor.

Gosh all this Science is hard work (especially after a late night sewing finish). I hope you had a great Easter Weekend too.

So close and yet so far

We spent most of yesterday outside, enjoying the sunshine, before it went. Today was indeed quite rainy, as predicted, and with plans to stay in I had high hopes for getting some sewing done (at last). I even swapped The Boy for my friends daughter for a couple of hours and once we’d all eaten (picnic in The Girls bedroom for them, homemade soup downstairs for me and LSH) I thought “now is my chance”.

IMG_4333

At which point, two girls appeared and asked sweetly if they could make “Monsters” again. How could I refuse? This is The Girls effort, which was mainly unassisted by me. She played around with stitch settings when sewing the limbs on. She also opted to make a flat monster again.

IMG_4330

Her friend on the other hand opted to make a Fat monster. This one was more of a joint effort with me, although she did do the majority of the handstitching (even rethreading the needle one time) and cut the arms and legs out herself. And of course, all design decisions were entirely hers. She was quite rude about my proposed construction method for the head (Right sides together?! That hole is too small for turning!),  but I put my foot down and it came out all right in the end 😉

IMG_4334

It was a good couple of hours rootling through my scrap tub and button box, cutting, pining, hand stitching and machine sewing. I even introduced them to the wonders of water soluble fabric markers! I’m really glad we did it but fingers crossed that tomorrow it’s my turn.

Lino Cuts

IMG_4310

The last technique I tried out at my printing class was lino cut. This one is me playing with some tools, seeing what kind of effects/textures I could get. I then printed it with a ombre ink effect for a bit more interest.

IMG_4314

I stuck this lino star in a frame for LSH’s birthday. He seemed pretty chuffed (but maybe he’s just keeping on my good side until I finish his third and final hoodie). I was pretty chuffed that he twigged straight away that it was  supposed to be two interlocking penrose triangle‘s (the effect didn’t show up as much in actuality as the idea in my head, but hey. It was good mental exercise for me sitting in my class working out how to draw them too!).

IMG_4311.JPG

The next week I made a second lino cut to be used with the first, although not entirely “properly”, so getting them to register was a bit hit and miss, but that’s all part of the rustic charm look I was going for, honest.

IMG_4312

Anyway, he now has a choice of these 2 colour versions if he wants to replace the one in his frame. (Hopefuly not the red, that looks a little horror filmesque in real life, I’m thinking of including one with the zombie apocalypse bag, when I finally find where on earth I’ve left it and get around to sending it. Bad friend.)

I’ve really enjoyed using lino prints, they give a similar effect to woodcuts, which I’m always drawn to. As a bonus, it’s possible to do this technique at home too.

It was the last day of my course today, but I still have to go back and collect today’s prints once they’re dry. And I would love to do some more printing in the future, it has been a really fun and appreciated Christmas present.


Beta Bicycle Hoodie

IMG_4102

After the so close and yet so far Hobbit Hoodie, I knew I wanted to make Long Suffering Husband another hoodie for his upcoming birthday. Things were discussed. Very complicated things. I also had a look around for a better pattern and didn’t get very far, I was beginning to think I’d have to draft one myself. Eek.  And then I spied this grey (terry?) knit in my local fabric shop. It’s not much thicker than a t shirt weight and not great quality, but it was cheap so I snapped up 2 metres and got drafting, making a raglan pattern using an existing top of his as a guide and pinching the pockets and the hood from the Lekala pattern that I used last time.

IMG_4132

Turns out 2m wasn’t quite enough but I decided to use some nice thickish black t shirt knit for the pockets and hood (with a pieced bicycle central stripe as directed) and with the black ribbing I think that looks pretty good.

IMG_4106

If I’m being critical the fit isn’t perfect, there’s a lot of excess fabric pooling along the raglan seams at the front and it has a bit of a bat wing thing going on, but it’s sooo much better than the Lekala/hobbit version so it’s definitely a step in the right direction. In particular it’s long enough to stop drafts getting to his lower back and also reaches the end of his wrists which he’s quite pleased about.

IMG_4136

I didn’t bother with holes for cord in the end as I’m not sure he’ll actually wear the hood up. Which made me wonder why I’d made the hood, but then you can’t really have a hoodie without a hood. The hood looks quite odd up, so in hindsight I probably should’ve bothered, but I’m not worried enough to change it unless I get complaints!

IMG_4103

Anya The 3rd

IMG_4072

What do you do when someone returns some fabric you offloaded gave to them with extra’s?  I gave a friend the two fabrics top left last summer as potential pockets for a skirt and then all of this little lot turned up in a parcel (whilst I was trying to have a sort out no less).


Merchant and Mills Union dress.  It started off life as a skirt.  Then I decided it had to be a dress, but made a mess of the button holes.  The button panel fabric is courtesy of prolificprojectstarter - used with many thanks!  Finished today, but started in 2015 :-):

I’m pretty sure that this placket (no sniggering at the back there) is all she used it for too so I must’ve got back nearly all the stuff I gave her.

IMG_4093

Well I can’t stand for that sort of nonsense. How’s a woman supposed to reduce her stash with that kind of thing going on? (She’s even just joined the stashbusting group at my suggestion, this was not what I had in mind).  So I did the only logical thing I could in this situation, I made her a bag with the fabric she sent. I reckon it’ll nicely match her Merchant and Mills dress don’t you think?

IMG_4094

Another Anya bag no less. All from stash, mainly the left overs of my skirt that she’d returned, but also some bits of my old jeans for contrast, one of LSH’s old shirts for a lining and some snazzy bronze piping that I think I might have actually properly installed. Oh and some bias binding to help me eek straps out, finding a big enough piece of fabric to make the straps as directed always seems to be my biggest headache when using this pattern to scrapbust. It was a straightforward make, apart from having to unpick things as I’d sewn a strap on twisted.

IMG_4092

Oh and I made sure I filled it with a little something extra before returning the fabric to her. That’ll learn her.


Car Crash Pants

Some projects you need to persevere with. Some you need to take a break from. Some you need to put on one side for a while. And some need abandoning all together.

IMG_4089.JPG

I think these boxers maybe should’ve been in the last category, not the first. The fact that I didn’t have enough of my 2 chosen left over fabrics to cut them out didn’t deter me. Even the fact that I didn’t have enough fabric to piece them didn’t deter me. Still, maybe it was for the best as my sewing skills today have been atrocious (don’t even talk to me about the binding that stretched the opening to about 2ce its orignal length), so they have saved me from mangling something more precious.

IMG_4090

So, with the help of one of my old t shirts, they are done now. And they are at least cheery. I’m not sure what the Long Suffering Husband has done to deserve them though.

World Book Day

When taking my obligatory World Book Day photo’s I realised that I had sewn more in Feb than I remembered (I told the Stashbusting group that I’d bought lots and sewn little. The former is still true though).

IMG_4081

This dress for instance (and yes it is a dress, though the bottom portion is mainly hidden, I couldn’t be bothered making a t shirt when she hasn’t worn one in months). Not my first choice of fabric for her (bought for me in fact, still a little left though) but the most “Astridey” that I had. By the way, Astrid is a character in the film/tv How to Train Your Dragon. The Girl is reading her way through the books at the moment, but they have very few female characters and her friend assured her there is a book of the film with Astrid in so it ticks the World Book Day box (and seriously, my kids read enough, I promise, we have more problems getting them to stop reading in order to eat etc).  Anyway, I made a very simple dress as apparently none of her current clothes would do (she kind of had a point, butterfly prints aren’t very “viking”) using the same pattern I used last summer. Two pieces, a bit of shirring, bam, you’re done. Shame I forgot the neck is very wide and low, need to fix that  should I make it again.

IMG_4084

And the skirt, made in some horrid velour finish denim that I unadvisedly bought online thinking it was something different. Looks usefully a bit leather like though. The skirt is lined with black scraps after it was declared “too gappy”.  It was going to have some studs added (like the very simple selvage headband, but  a bigger size) but I ran out of time and energy. The outfit was originally made for her birthday party and after hubby and I had  made simple drawstring viking style party bags with it (using ribbon and a pony bead to close them, you can just see hers attached to the special loop on her waistband) this stuff was about all gone. Yay. Shame I bought purple too.

If the shoulder armour looks familiar it’s because I used the free pdf pattern from Falafel and the Bee, thanks guys! I got each set out of 1 A4 piece of craft foam, punching holes with my trusty hole punch and using a butterly clip to fasten them and gaffer taping safety pins on the back for fixing. Sheild painting was a party activity, I’m pretty impressed  with hers!

IMG_4085

The Boy, on the other hand, made his outfit all by himself, turning a waistcoat back to front, utilising his skateboard pads, adding logos and generally using lots of masking tape. (Including to hold the tin foil onto his shoe to mimic a rudimentary metal prosthetic foot).

IMG_4087

Oh, except for the grieves, which were prototypes for the Girls and are laced with elastic for ease of getting on/off. (A smidge more of the dreaded fabric gone).  I didn’t make the complicated dagger and sheath affair though.

IMG_4086

And it’s all over for another year. I wonder what we’ll end up doing next year?

(I can’t find a photo of my favourite, the Nooks with Books on Hooks, so I’ll leave you with these random robots from our first ever participation in world book day)


Shhh

I just realised that it’s Long Suffering Husband’s birthday a week today yesterday. Eek. I haven’t even ordered the fabric for the hoodie he wants yet. (Which is partly a good thing, as I have found a better option than his original choice of fabric, one that requires less work from me too).

IMG_4076

Anyway, to make sure that I had something to give him on the day at least, yesterday I whipped up a pair of Comox Trunks, as he has commented more than once that the last pair are really comfy. The black is some lovely organic knit from my stash and the stripes are scrap, pretty much the last of this fabric.

IMG_4077

Spotted the deliberate mistake yet? As I was doing this on impulse, I didn’t think things through and cut two of pattern piece number 2 from the stripey fabric and 2 of pattern piece number 3 in black. However, the cup part of the trunks needs one of each piece, so really I should’ve cut 1 of each in stripey (for the outer part) and 1 of each in black (for the inside). There wasn’t enough stripey left to recut an extra piece though. Rather than have a half black half stripey cup both inside and out, I used both the stripey pieces on the outside, making these trunks, err, accessible from either side.

IMG_4075.JPG

The opening is still functional as I folded over the inside cup, like I did last time, mimicing the shop bought trunks in our house. Note for next time, cut one piece number 2 and three piece number 3 next time to acheive this. (Must remember to annotate the pattern pieces tomorrow when LSH isn’t around straight after this blog post).

IMG_4080.JPG

This time I also topstiched all the seams down with my imitation coverstitch stitch on my normal machine too.

The elastic isn’t a great match, but it’s the best I had and I won’t find better locally so I used it.

Right, I better go and order some fabric then. Just as soon as I’ve finished the washing up and annotated my pattern pieces. What sewing have you got planned this week?