Birthday scarf

I bought two skeins of hand dyed mulberry silk yarn on the Isle of Skye last year, with some birthday money, and I’ve just finished knitting a scarf with it a few weeks before my next birthday. I’ve really enjoyed knitting with it as it feels so soft and silky and has a lovely lustre. The colours remind me of a flower meadow.

IMG_0240

I was unsure how many stitches to cast on, so it seemed only right to choose 42. I knit mainly in moss stitch (the mistakes just give it charm) until I ran out of yarn and was random with my colour striping of the mainly green and mainly yellow yarn.  The resulting scarf was a bit short, so I made it into a mobius strip.

IMG_0258

My mum has commented more than once that she liked the random effect in this scarf (but it’s not her colours), so I’ve started anew with new yarn and colours, this time casting on 35 stitches (as I thought she’d want a slightly narrower scarf and have learned since last time that it’s easiest to have an odd number for moss stitch, so you can always start with the same stitch – we’ll see if this results in less mistakes). Hopefully this one will be finished in time for Christmas.


M is for?

IMG_0182

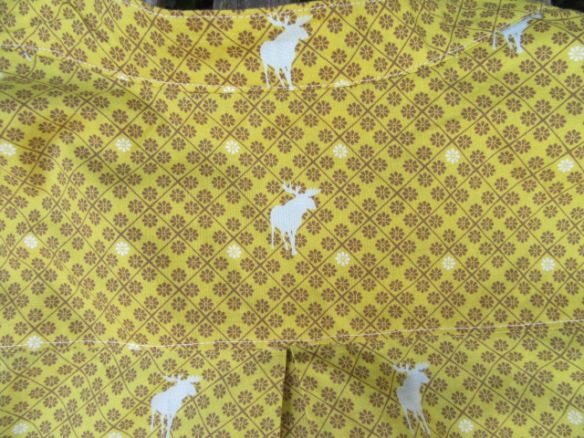
Mind the Moose Mila shirt, natch (with printed selvage edge made into a label).


IMG_0226

Stashbust? Check. Bought this last year on holiday in Wales (later found my local fabric shop stocks it too). Pretty much the whole 2m used.

IMG_0209

Seasonal Sewing Wardrobe Challenge? Check.

IMG_0206

Pattern? Itch to Sitch Mila shirt. So now I can be a total fan girl in this and my Liana jeans.

IMG_0188

Well drafted? Check, all lined up perfectly and you get to chose your upper chest in A, B, C, D or DD cups.

IMG_0196

Customer service? Excellent. When I got confused as to which size to choose someone suggested I ask Kennis on facebook and she looked at my measurements and suggested 12DD top graded to 18 a the waist and hips. Seams to have worked fine.

IMG_0192

Instructions: Excellent, and leads to to really professional finish. I had never inserted a partial placket before and it went swimmingly.

IMG_0185

Any deviation from said instructions? I wimped out on narrow curved hem and used satin bias binding instead.

IMG_0213

Pattern Alerations: As it was drafted for people up to 5’7″ and I’m 5’8″ and like things long, I added 1 1/2″ to the length. I probably didn’t need too.

IMG_0195

Sulkiest Machine Moment: Buttonholes. My machine, always fickle with buttonholes at best, decided to try and chew up the fabric. Eventually, I had a brainwave and unscrewed the throat plate and found a serious lint build up, eurghhh. I spent 15 minutes clearing it all out and after a wait while I made jeans, gave it a go, and it was much better. I also worked out that I need to turn the stitch length down 3 notches for the last step of the buttonhole (when it stiches forward down the right hand side) in order for the two sides to match up.

Overall? Not the quickest make, but the finish is great and I have a sunny yellow shirt.

IMG_0186

Best pattern matching moment: Check out the moose down the placket and on the centre back of the collar.

Best comment: “with that label in it it looks like you bought it” LSH.

Fabric bought for the next one? You betcha (don’t tell the stashbusters, but I really don’t have much lightweight fabric in my stash).


Lovely Liana

Did you spot the anachronism yesterday I posted about my camel jumper? Anyone?  There are probably a myriad of mistakes I overlooked, but the glaring error to my mind is that I said I had nothing to wear it with and yet I was wearing it with a pair of jeans it looked fine with. So, I’ll let you into two secrets. The first is, that post sat waiting for photo’s for over a week whilst I failed to take photo’s (top tip, if you put something on in the morning so you get a photo of it, don’t have an impromptu gardening session first and cover it in mud).

IMG_0152

The second is that whilst I was waiting for the photo’s I made jeans. But I don’t mind if you didn’t notice, I’ll just take it as proof that they look pretty professional 😉

IMG_0166

These are Itch to Stitch Liana Stretch Jeans. There was a sew-a-long back in December, but I decided I didn’t have time to pfaff about getting jeans to fix back then.

IMG_0160

More fool me as these are the size 18 straight out of the packet, no alterations, and they are the best fitting pair of jeans I can remember having (although there are wrinkles so might investigate alterations before the next pair, and there will be a next pair, but then again, I might just be lazy).

IMG_0142

My favourite bit was topstitching the back pockets, such fun! (And yes, I have sorted those loose ends out now).

IMG_0165

Now I’ve made them I understand why a couple of people I know have been raving about them. First off Kennis’s pattern is impeccably well drafted. See that coin pocket, there is a different sized one for each size of the pattern (and for the back pockets too) Seriously. And a pattern piece for the belt loops (rather than just cut a piece of fabric x by y). Oh and those pockets you see have pocket stays too. And there are three different leg options, skinny, straight or bootcut, I went for the latter.

IMG_0161

The instructions (with diagrams, I love a good diagram) are really clear, including when to finish seams, when to topstitch, what to do if your machine doesn’t have a bar tack function and a great way of inserting the fly. It all leads to a very professional finish.

IMG_0108.JPG

Can you tell I love them? There will soon be a pile like this again awaiting construction as my red jeans are on the mending pile with fabric failure, as for a while they were the only jeans I had so they’ve seen quite alot of use. I need to make a second pair of these before they go the same way…


Slow Camels

Apparently camels have a gestation period of 13-14 months. Who knew? Maybe that’s why my new camel jumper took so long to make, about 12 months from buying the fabric to having something to wear.

IMG_0153

I ordered this fabric before going on a screenprinting course last year. The inks used on the course would only work on paler fabrics, so I planned to print on some  of this grey marl fleece backed sweatshirting, but when I found that was sold out I decided upon some green instead, however worrying it would be too dark, I chose the latte as well. Turned out the green was fine to work with, so I decided to use the latte for a test garment.

People Tree Peter Jensen Bear Print Women's Jumper Burgundy Melange ...

Small problem, I don’t wear this colour, at all. I was wondering what I could do with it, and musing on the fact that it was more camel coloured than latte coloured when inspiration struck. Camels! I wanted to make an all over camel print jumper, inspired by the all over bear print people tree jumper that my friend has.

received_1640128819535692

Turns out camels are surprisingly difficult to draw (go ahead, have a go, I’ll wait….., see, told you).  Luckily my niece is an arts student and she kindly rustled me up a quick sketch and emailed it over, which I traced over and shrank and then ordered it made into a custom screen from thermofax screens with some birthday present money.

More delays whilst I played around with screen printing and then in January I decided the time was now and made a pattern from an old beloved worn out sweatshirt, cut out my pieces and got printing. Which is when I realised that the camel was never going to work quite the same way as the original bear inspiration as a) it’s directional and b) I only had one sized screen (the bears come in a variety of sizes). LSH persuaded me that less was more and I ended up with a mainly camel coloured jumper with a few camels on (more on the back as he wasn’t looking when I printed that).

I was pretty pleased at how my self drafted pattern came out. Patch pocket: good. Ribbing at sides as per original: worked perfectly. Adding extra ease into the sleeves to account for this fabric being thicker than the original: spot on. Nice long cuffs that when folded down reach my thumb: check. And then I added the collar. Arrgh (see evidence above). Horrible, wrong, not what I intended. Despite this being my second attempt at the collar (having tried a collar first and redrafting the pattern pieces as it wasn’t right). I think partly my neckline is too wide (not much I can do about that) and this fabric is thicker than the original hoodie and behaves differently.

IMG_0169.JPG

It sat, nearly done, in the naughtly corner through all the cold weather. Finally I redid the collar, taking length out the back and height out and reapplying the eyelets with interfacing added to the back now so they stay in. It’s not perfect, but I’m happier with it and the fabric is so snuggly and cosy I just know I’ll be wearing it anyway. Once I find something it goes with.

So, I now have a camel jumper, that came out nothing like I planned but is very snuggly and comfy to wear. Maybe now I can start on the “real deal” green version (with a few tweaks to the too wide neckline and probably a rib finish).

Oh and this is the twin of the Hobbit Hoodie, we were both wearing them today!


IMG_0151.JPG

Dennis

IMG_0129

Take a metre each of red and black fleece, divide and cut each piece into 4 identical strips (the whole width of the fabric), sow 7 boring long seams (the width of the fabric after all), topstitch/flatlock/coverstitch 9 horrendously slow times (to hold your seam alowance open and finish the ends), yelp with relief that it’s over as you stretch out your back and shoulders, go upstairs, put the new throw/blanket on the bed of the number 1 Dennis the Menace fan in your life, get a winning smile and a hug in return that will see you through all the yaking of bedtime, however politely but firmly refuse any request to take a catapult to bed…

IMG_0132.JPG


Farewell to dining table sewing

<meta
http-equiv="X-Frame-Options" content="DEI wanted to show you the last thing I made before I got my new sewing space, some Domi Shorts. I was really pleased to find the Sofilantjes Pattern range when someone from the Stashbusting Group posted a pic of a Semper Sweater. There are boys/unisex patterns, in everyday style clothes and the size range on the patterns is huge (12months – 14 years). Plus being based in the Netherlands (the patterns are available in either Dutch or English), there are samples made in the bright patterns that my son loves. Anyway, to start with I bought the Semper sweater (which was on offer at the time) and the Domi sweatpant pattern, as it was perfect to make the long shorts I had in mind to use up the rest of the cogs and gear fabric  and should  also come in handy when I have to replace the star trousers.

Yup, this photo is awful. I can’t take another one though as I’ve given them away. They came out too small! This may well be as I was going pretty fast when I made these and not stopping to think. I measured the boy, waist, hip and inside leg. His hip size fell in age 7 range, the inside leg and I think the waist too came out as age 10. This should’ve rung alarm bells as my boy is a straight up and down beanpole, his waist is not 3 sizes bigger than his hips. However, the pattern said to go with the hip and inside leg measurement (presumably as the waistband is elasticated) and he is skinny for his age, so I made them in the size 7, but cut to the length of the size 10 (which is still always going to be shorter than a size 10 as you loose crotch length). I made them the 3/4 length but without the cuff, hoping for a below the knee long short look (that would grow with him into above the knee shorts!). Anyway, they just fit but only just in a slim fit kind of way and were above the knee. On reflection, the pattern did state that they’ll fit more loosley around the hips of boys as they tend to be slimmer there than girls, so probably I should’ve made a size 10. I was a bit frustrated, as I love this fabric and don’t have enough left for a remake, but I’ve found a good home for them and next time I make something from this company I will remember that they’re not drafted huge like a big 4 pattern!
The shorts themselves were a quick make, the pattern is straightforward and the instructions are clear. I love the curved pocket openings (although as stated in the pattern, if you choose this option they don’t fit much in) and the eyelets I used to thread the cord through having helped them to come out looking professional. I was pleased with the lime green and teal combination too, I’m glad they’ve found a good home!

Ohh, and let me tell you about mynew sewing space. The Great Sort Out is still going on, but now that we’ve banished the kids up to the attic (in separate rooms), their old room is our new spare room / sewing space / work from home place. I have repurposed an old table to be my sewing table and tried to get organised with a home made spool holder and some tubs from IKEA and I’m really pleased with my new lamp. The hand cranked adjustable height table on the other side of the room is from IKEA too, perfect for when LSH is working from home as he can sit or stand at it and help prevent back issues. When he’s not using it it’s great for taping PDF’s together and cutting out patterns. I also found an old pile of mending, including 2 pairs of age 3-4 trousers and a coat, all now mended and passed next door for their 2 year old to grow into, along with some trousers for LSH.

Speaking of which, LSH has been using the new space for sewing too, raiding my scrap pile to make a new rag coat for the latest morris side he’s joined. The Girl had great fun chasing him round in his new coat trying to spot where all the fabric was from, including hte hidden fairies.

Has it just been two weeks?

Ah, the Easter Holidays.


Woodwork in the sunshine.

Going for walks and meeting up with friends.

Science @Bristol.

Lie ins and lots of chance to read (including in the washing basket / laundry hamper for no discernible reason).

Relaxed bedtimes and glorious sunsets.

Climbing trees and playing with friends.

DSCF0310.JPG

Camping with friends from far away…

DSCF0318.JPG

in our Half Way House of Hay on Wye…

where we hung out, made dens, toasted marshmallows and tested out our new wellies.

Oh and a little bit of sewing, mainly this self drafted onsie, made to replace the shop bought pink one, using up the last scraps from her Christmas dress. Fairly painless, despite the jersey placket (Iron-on Interfacing and Internet Tips for the win), although I did have to remove a misapplied snap with pliers.

IMG_0021

Of course, there were the usual grumps,tiredness, bickering and the occasional tantrum too, plus rain, wind and hail, but overall, it was a great break.

Roll on summer!