It’s as easy as 1, 2, 3

How it goes round these parts: Fall in love with fabric online. Justify that it’s just perfect for someone in your life. Buy it. Get alarmed at the scale of the print (cos I didn’t pay attention to the shot with the ruler in for scale). Make it up anyway because you own it now.

The fabric came from my favourite knit fabric online shop (yes, I’m addicted).

Maria Denmark Kimono T

Meet the lovely Kirsten

First up I made a Maria Denmark Kirsten Kimono T shirt, in a nervewracking guestimated size with a smidge of length added. Fingers crossed she likes it (and I tried hard to avoid placing spots in the embarrassment zone).

distressed finish close up

distressed finish close up

I bound it in plain black fabric using this method (I think, I got confused at one point and abandoned instructions and winged it instead). You basically sew your folded in half band on upside down, so instead of a nice neat fold you have 2 raw edges that curl up. I bound the sleeves and bottom hem similarly, cos, I thought it would look good. I think it does. (Oh and I stumbled across a bunch of name tapes from my school days and cut one up and used my maiden name as a label, as it happens to be her surname (it’s almost like we’re related).)

Banded Barrie Briefs

Banded Barrie Briefs

Next up were some Barrie Briefs for me. I had to piece them to get them out of the fabric, but this time the seam is along the front of the gusset, not down the centre front, which looks much better!

rear(less) view

rear(less) view

Spurred on by how much I loved the look of the black binding on the t shirt, I actually made the bands this time instead of copping out and dipping into my stash of fold over elastic. Thoughts: its straightforward but it takes longer, the banded ones offer more coverage (unsurprisingly), the waistband needs stretching when attaching it much more than the leg bands do, I think the leg bands feel a smidge tight (from a brief try on for fit, I’ll see how they wear).

he only wanted to stick out his tongue

he only wanted to stick out his tongue

Finally, I sewed up a remnant into a tube to create one of these.

still sticking it out

still sticking it out

His dad wanted it too, but he looked cuter in it so he won.

finally, a shot where you can't see that he's still sticking his tongue out

finally, a shot where you can’t see that he’s still sticking his tongue out

I still have a small piece left I’m not sure what to do with. Must Use All the Scraps (it saves on having to change thread/needles etc).

What do you do with your leftover fabric?

*********************************************************

P.S.

Just seen this explanation of the neckline finish which reads a lot more clearly to me than the link above. Maybe that’s just because I’ve already figured it out, but as different people have different learning styles etc etc, I thought I’d include it just in case. Plus I love that blog.

The End is Nigh

The end of term that is. Indeed, the end of the school year.

[Rant alert, feel free to skip the next 3 paragraphs if you want less opinions and more sewing.]

I’m not sure I should admit this as I risk looking like a callous human being, but I get annoyed with the expectation that everyone should get their child’s teacher a present. When did that happen? I don’t ever remember a present being given to a teacher by me or on my behalf. (Maybe I just come from a mean family). Don’t get me wrong, I have no problem with people giving presents if they feel they want to. I’m just annoyed with the expectation that everyone will and the pressure this puts on parents, some of whom will, by law of averages, be hard up, stressed, time poor, busy, forgetful, unorganised, etc. I had a discussion about this with my teacher friend. She reckoned it was a good thing, because teachers work hard for long hours. I also think teachers work hard, for long hours and are deserve a higher status in the society we live in, but I have this idealist streak that reckons that they should be recompensed for their efforts in their paypacket, not by me feeling I have to buy them a box of chocolates or I will be the one parent in the class that hasn’t bothered.

So, why the rant? Well, partly cos I like to put the world to rights, but mainly, because I happen to have made some presents for people who work in schools and I want to make it absolutely crystal clear that it’s not my intention to put any pressure on any other parent or carer to do the same. Last year, I was the busy stressed unorganised parent who did nothing. Actually, without going into details, I was also quite cross with the school “system” at that point and feeling quite let down in certain ways and frankly rewarding anyone associated with that system, culpable or not, was not top of my list of priorities.

However, this year, there are several members of staff that have worked extremely hard to help my nearest and dearest and shown great patience and care, both to myself and my offspring. Staff that keep me informed, listen to me and change what they’re doing due to my feedback. This time last year the thought of school related things had me in tears more than once. Now I feel we’re really getting somewhere. And I genuinely want to say a really big thank you to several people who I know have worked really hard. Which means saying thank you to a couple more as well, to satisfy my children’s sense of fairness too. And me being me, I may have got a bit carried away with the “oh I could just do this” plans. Which is a refelction of my crazy tendancies to give myself complicated tasks that I don’t really need to be doing.

Ok, ok, enough justification, onto the sewing.

Back a while ago I went on a screen printing workshop, cos it sounded cool. Once I started planning what I wanted to print onto which fabric, I realised that I wanted to print LOTS OF FABRIC, because I could, and when would I get that chance again? But I only had limited space on the screen for my designs and I wasn’t sure I wanted lots of things that were all the same. So, I printed some stuff for me (which I haven’t made up yet, partly due to complicated project critical path reasons, partly as it’s for me, so there’s no deadline) and also some stuff to make into gifts. So that I could print lots of fabric and not have to have everything I own with the same design on (see, it’s a lot more selfish than it appears at first glance).

I’ve already blogged about the small tote bags I made. These were fairly straightforward and were made before the printing. Well, I’ve finally made the storage boxes that I planned too.

dandelions in action

dandelions in action

They’re made from some green linen I got in a bundle and dyed a slightly bluer, less in your face shade of green. They’re cubic in shape, with 5 square sides (and an open top). The base is plain and the upright sides alternate between the two designs of a big dandelion and a three smaller dandelions in various stages.

Filled with stuff

Filled with stuff

I added little handles to them after seeing something similar online. I lined them with scrap fabric, each one is different.

New home

New home

The first two I filled with home made mini scones (which the kids helped make), home made strawberry jam (which I had to reboil as it didn’t set the first time, so annoyed with myself for all the wasted time and effort (and jam, as some was inevitably lost in the process)) and some clotted cream. See, I told you I was going a bit OTT. These are not actually for teachers, but for the long suffering office staff. I spend a lot of time in the office one way and another. They went in at the beginning of the week, as they were for sharing. I forgot to take a photo at the time, but one of the bags got given back and I was too embarassed to explain it was part of the present, so I kept it.

Ready to go

Ready to go

Today all but one the other’s went in (for complicated reasons, the kids don’t actually break up until Tuesday). They had some homemade biscuits in that the Girl helped with (her brother was too tired) and one had a cake in and some dog pull toys the boy made out of scraps for his dog owning favourite teacher. (Instructions from this tutorial.)

Dog pull toy

Dog pull toy

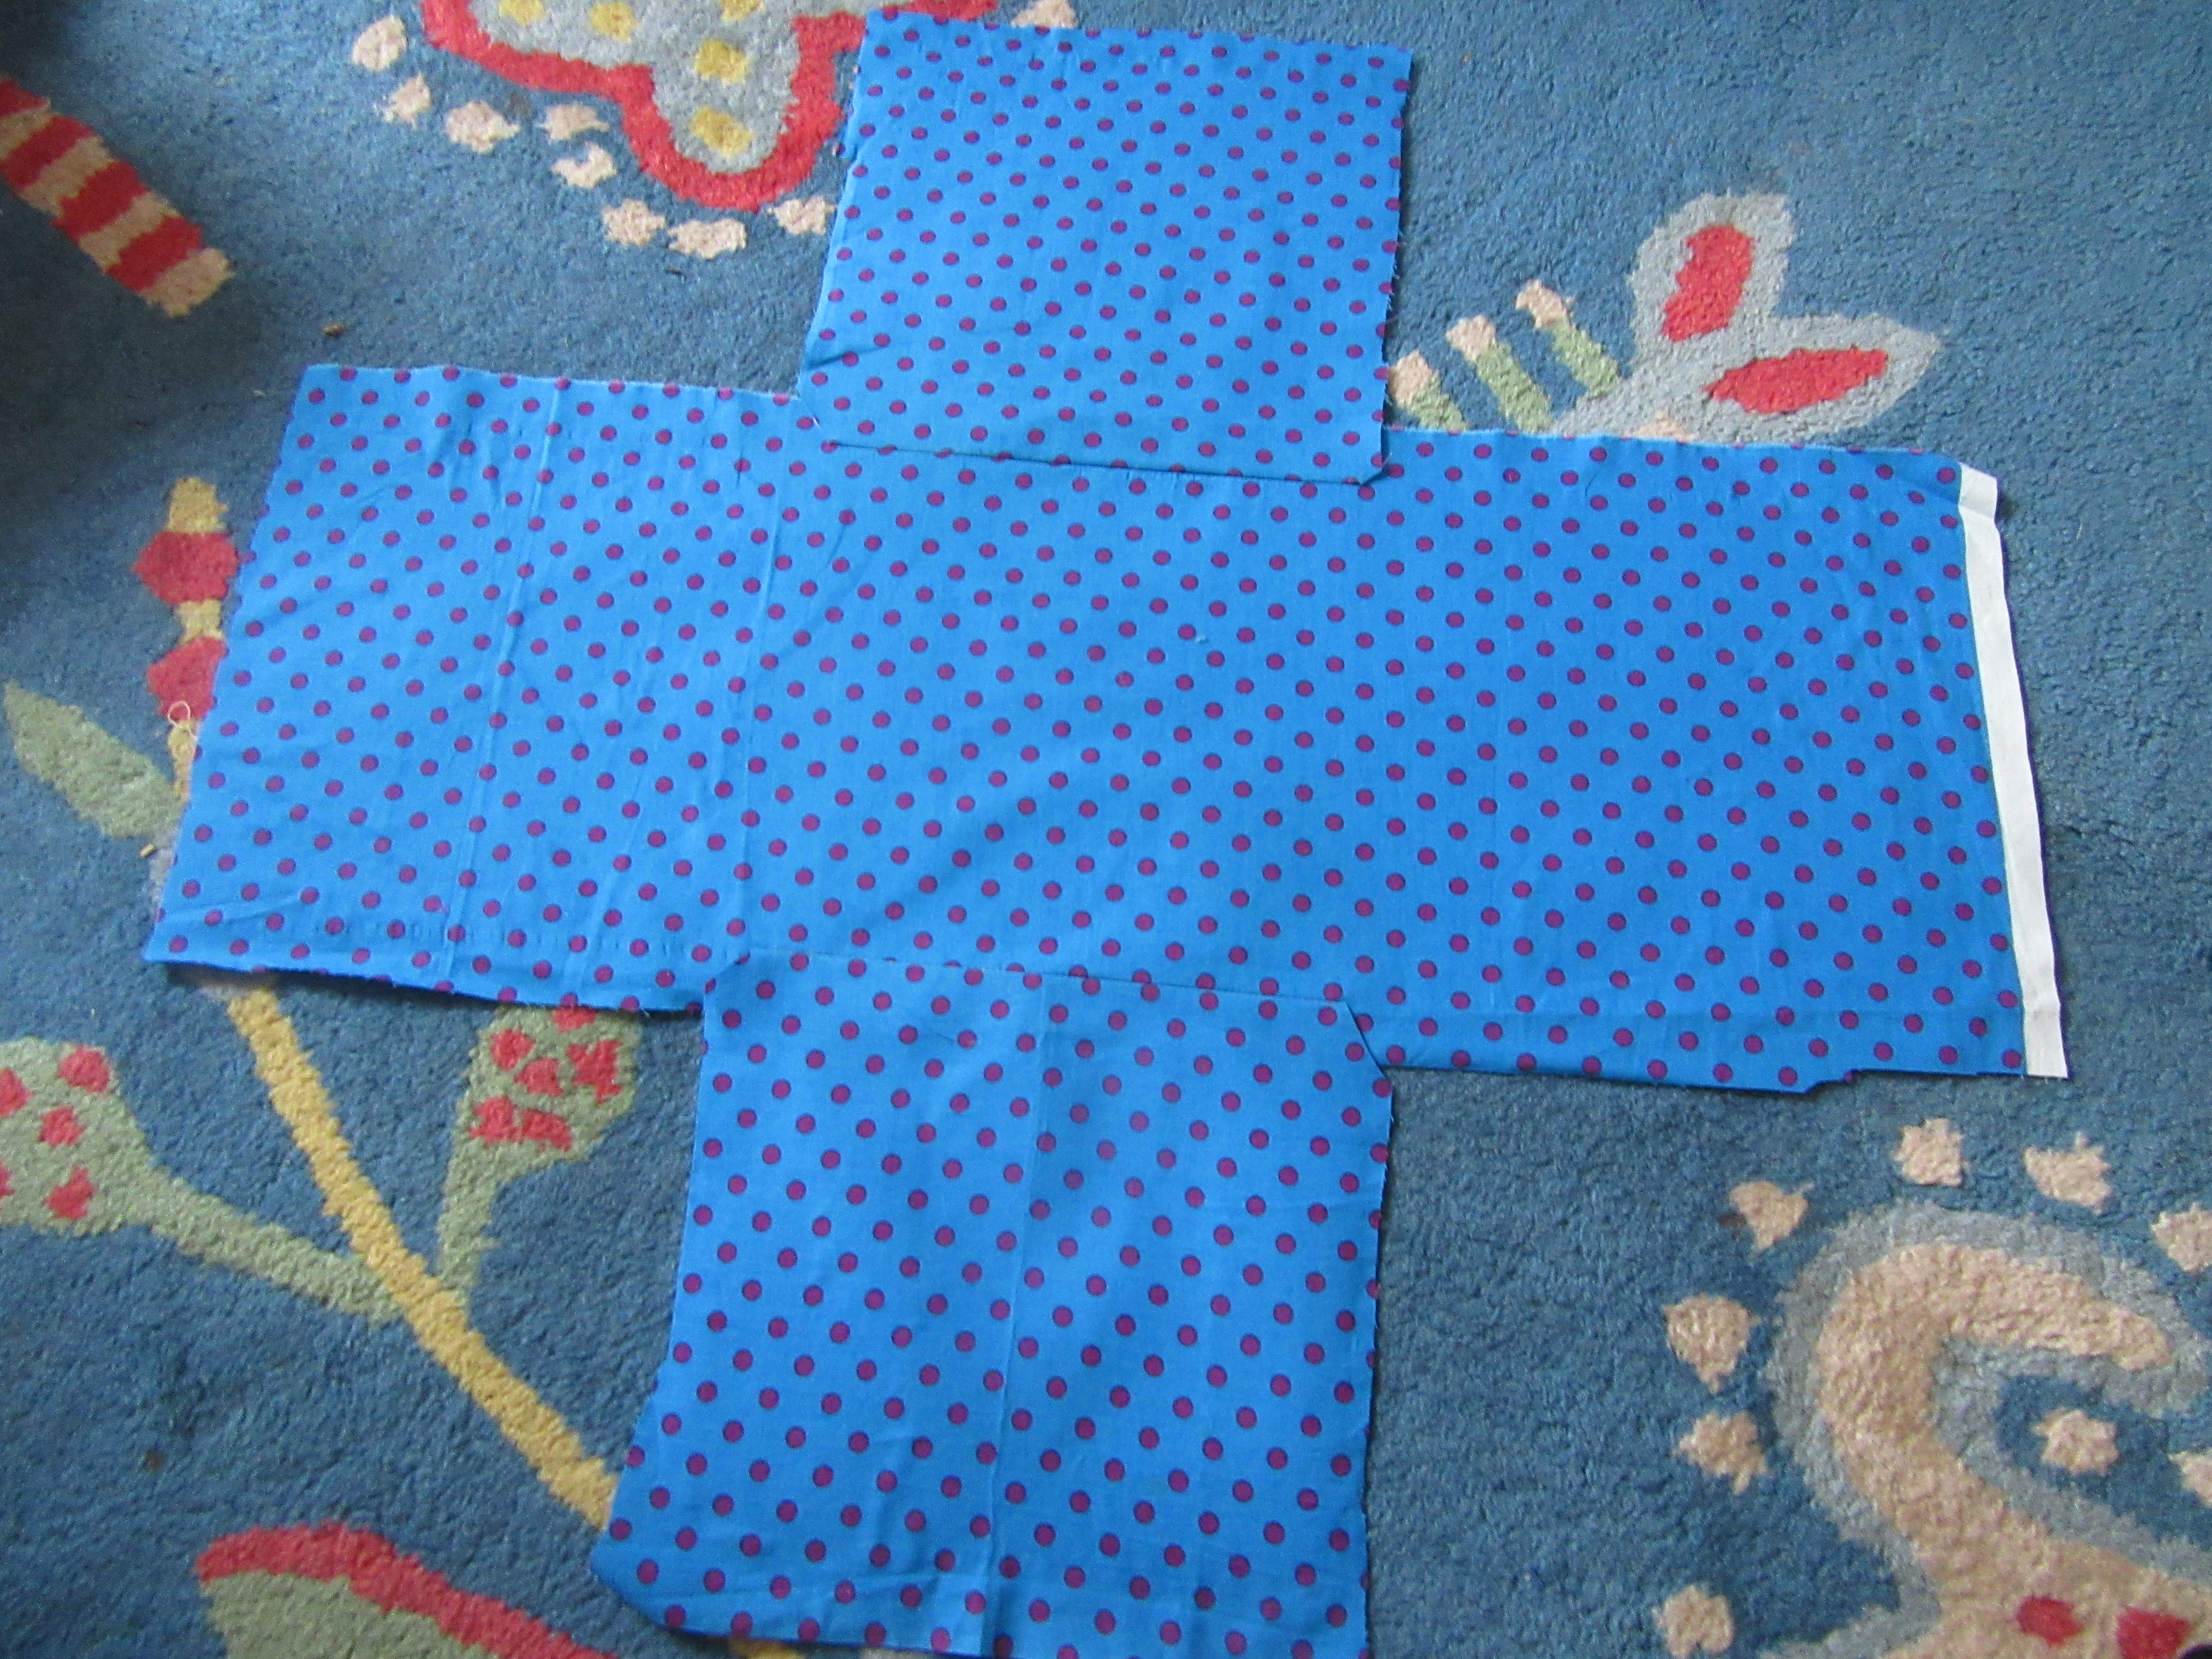
Just in case you’re wondering, to make my boxes I drew a square template out the size I wanted each side to be. Then I cut one piece that was 3 squares long (plus seam allowance) and 2 single squares (plus seam allowance). I interfaced them for added strength (particularly as I was using mainly linen and polycotton!).

pieces ut and ready to go

pieces cut and ready to go – you can just make out the purple pen lines which show the top piece is 3 squares side by side.

Then I sewed one side of each of the small squares to the middle third of my rectangle to make a net. Remember to press these seams now as it’s quite tricky once the box is assembled (ask me how I know).

nearly there!

nearly there!

Next the 4 side seams need sewing (you can work out what those need to be right, right?). I pinned these and sewed each from the top into the corner. In order to release fabric at this bottom corner to make the side seam easier I first cut the square side piece on the diagonal and also snipped the seam allowance of the rectangular piece.

trimming before turning the corner

trimming before turning the corner

Anyway, side seams sewn and you get a box. Make 2, sew right sides together around the top but leave a gap, turn, press, topstitch around the top and Bob’s your Uncle.

Hmm, that wasn’t the clearest explanation ever, so ask away should you want more details.

I think the boxes came out pretty cool and I’m secretly pleased I got to keep one. I hope to go on another one of their courses sometime but the next couple of date’s they’re running aren’t good for me. Still, that leaves plenty of time to come up with more ideas and also play with some other things in the mean time!

Crocodile

Croc in action

Croc in action

Proud Mummy moment. He made this. All by himself. From a scrap of some boiled wool (after I cut out a waistcoat that, err, I haven’t finished yet). It just looked crocodile shaped to him, so he made it so.

Da Crocodile

Da Crocodile

I can’t remember exactly how he did it as it’s been nearly finished just awaiting the stuffing hole to be sewed up for months (hmm, wonder who he takes after). But I metioned that the smaller boy he wants to give it to is having a birthday on Friday and that was all the motivation he needed.

I think he sewed it on the machine, then turned it. I’m pretty sure I suggested the beads for eyes but he sewed them on. It’s stuffed with cut up scraps of jersey.

Having fun

Aren’t libraries brilliant? I was in our local one yesterday, child free, with my husband (luxury) and I remembered to look at books for me. I started by looking at knitting books. The only one there yesterday that I liked the look of was Knits Men Want. The synopsis is that a Male Knitwear Designer is helping his fellow Female Knitting Fanatics with the thorny problem of the man in their life not wanting to wear anything they knit for them. The answer (spoiler alert) is to knit them something they want to wear rather than something you want to knit and the key points given are to keep it simple, use plain muted colours they like and yarn that doesn’t make them itch. I’ve taken it out on loan because it had a Grandad Shirt / Henly style jumper, which looked great and also a hoodie with a bold stripe across the middle. I won’t make either because my knitting patience doesn’t extend to garments that large, but I want to linger over the patterns a while pretending I might first. The photographed garments are beautiful, mainly as they seem to have used really expensive yarn (think I spotted some Rowan tweed or similar). From a knitting perspective, the thing I liked most was that the patterns are not yarn specific, you swatch your chosen yarn and work out the gauge. Then the pattern has instructions for several gauges (between 4 and 7 depending on the project) in 6 sizes. How cool is that?

Anyway, I’m going off on a tangent because on the same shelf I found Fabric Manipulation by Ruth Singer, which is brilliant. This is a book of techniques for manipulating fabric, organised into clear sections, with short, clear explanations illustrated with diagrams of how to do them and lots of photo’s of the finished technique. It has a few project idea’s in “you could use this technique to make a scarf” but mainly the idea’s sit out of context of what you would do with them, they are just a reference of all the amazing things you can acheive with fabric. I sat in the library looking at all the amazing shapes and textures that Ruth had created with by folding, gathering, pleating, tucking, ruffling, shirring, … There are too many idea’s in this book for me to explain.

our playing

our playing

Having decided that I need to limit my screen time when I’m around the kids (practice what you preach and all that), that evening after dinner I sat on the sofa and picked up the book. Before long I was having a little play, doing some smocking on a scrap of gingham, while my son tried following some instructions for folding ribbon (and his sister, finding that frustrating, folded some strips of paper instead).

One unassuming piece of old velvet

One unassuming piece of old velvet

The direct smocking I tried was fairly straightforward and I surprised myself at my patience with hand sewing. Next I decided to try some American smocking, and I got in a right muddle, until I realised that for this you’re working on the back, so it doesn’t “look right”, you have to turn it over to see what you’ve achieved. Also it was fiddly on the gingham. So I had a rummage around and found a piece of slightly faded red velvet I’ve had 20 years I reckon that was big enough to play with but nothing would be lost as it wasn’t really big enough to do anything with.

Grid marked on the back (over what appears to be a bodice pattern marked on in biro, a very old unfinished project that I don't remember)

Grid marked on the back (over what appears to be a bodice pattern marked on in biro, a very old unfinished project that I don’t remember)

First off I marked a grid on the back with the intersections I needed highlighted. Then I sat down to watch a film (also rented from the library) with hubby whilst I stitched. Top Tip, if you’re planning to sew in front of a film, don’t choose one with subtitles!

What a transformation. I can't believe I did this.  I just want to stroke it.

What a transformation. I can’t believe I did this. I just want to stroke it.

However, I managed to make my velvet do this, which is cool! But I’m really worried about the fragility of it as it’s only hand stitched (and my hand stitching at that), so I wanted to encorporate it into something, but what? (As I type this, hubby tells me that it this technique would make a great, if over the top, lining for an instrument case.)

the back

the back

It is sort of begging to be touched, a really tactile thing, so I thought maybe a cushion cover. But it’s not big enough, so I rootled around, wondering if I had something satiney to be another tactile thing to go with it. All I had was the leftovers from the girls cape lining, which is a very bold pink. Red and pink are quite a statement together, but I decided that it would be a nice kitsch feel, so I went with it.

how my playing ended up

how my playing ended up

I had great fun playing and now I have a piece of lattice smocked red velvet, framed by some shiny pink fabric (I tried using a quilting technique I’ve seen, but don’t tell any proper quilters, as it’s not that neat and I’m not sure I did it “right”), with “vintage” velvet ribbon around it (from my grandmother in law’s stash) and some more interest added by using a twin needle on a shorter stitch length than normal to create a kind of tunnel effect (another idea from the book).

close up

close up

Now I just have to turn it into a pillow case and find a home that will appreciate this glorious piece of kitsch (my daughter loves it but my son would trash it, I just know).

And I think I might book this book on my Christmas list… Any other recommendations for books I should put on it?

Resplendent

That’s how I feel. Because I’m wearing these

Is this a new low for me?  Or a sign of how far my confidence has grown?  Who knows. But I figured that they're are no less revealing than all the swimwear and bikini makes I've been seeing recently, and they look so</em? much better on.  (The extreme close up is my method of controlling which wobbly bits I unleash on the interweb!)

Is this a new low for me? Or a sign of how far my confidence has grown? Who knows. But I figured that they’re are no less revealing than all the swimwear and bikini makes I’ve been seeing recently, and they look so much better on. (The extreme close up is my method of controlling which wobbly bits I unleash on the interweb!)

Not just those, it’s not that kind of blog, but still.

So I have used most of the left overs from the girls new dress and have one more pair of undies to add to my dwindling collection.

This time I used Kitschy Coo’s Barrie Boy Cut Brief pattern (I think I may just sign Amanda over my soul), not my self drafted pattern. I printed it out the other day. I reprinted it yesterday afternoon when I noticed that for some reason there was a 1/2cm border missing at the edge of each sheet (sigh). I taped it together whilst the kids were getting ready for bed. And then I have made it yesterday evening. So I’m posting it now to prove to my friend that sewing can be quick!(This friend whom I saw yesterday and she was surprised that I’d only started making the dress my daughter was wearing less than 24 hours earlier. I put the time stamp on my camera. Don’t entirely believe it (as it’s an hour fast), but it does prove they were finished 48 minutes after they were traced onto the fabric ready to cut out). My top tips for quick sewing are: Don’t sew authentic reproduction tudor clothes (she’s a reenact-er, she does this), use a pattern (not try and draft as you go from a garment), use jersey knits that don’t require seam finishes and use a sewing machine rather than hand sewing! Using a pattern you’ve made before recently helps too).

I will fit these pattern pieces on, I will!

I will fit these pattern pieces on, I will!

So the details. My hips fell into a size 7 on the pattern and my waist an 8 (which is the largest size, cue self criticism of my diet recently and the effect it’s had on my waistline) so I cut a 7 (with the higher waist option) and crossed my fingers (spoiler – it came out fine). I only just fit the pattern pieces on the width of the left over fabric I had – and I only managed that by pining the fabric to the carpet to trace the pattern on (as the jersey was curling merrily up at the edges like a traumatised hedgehog).

Gusset, folded over at top before stitching. Check out the exceleent stripe matching to distract yourself from the less than excellent alignment on the right hand side.

Gusset, folded over at top before stitching. Check out the excellent stripe matching to distract yourself from the less than excellent alignment on the right hand side.

I sewed as per the “bad ass” short instructions (there are more detailed instructions with photo’s too). I folded the gusset front under before sewing it down for a neater finish than my interpretation of the instructions gave. But the main difference was that I used Fold Over Elastic from my stash rather than making bands to finish them.

Contrast zig zag on the Fold OVer Elastic (FOE), deliberate design feature, not laziness in changing thread

Contrast zig zag on the Fold Over Elastic (FOE), deliberate design feature, not laziness in changing thread

Yes, that’s right, I’ve been searching for an underwear pattern that doesn’t need elastic, found one, bought it and then hacked it to use elastic. Sigh. In my defense, I now have some FOE bought online in my stash and the green was a great match (although I used some slightly wider black for the waistband). I also didn’t have enough scraps of the stripes left to make the bands or the pateince as it was late at night.

Seriously, 3 pieces, 4 seams, they start to look like knickers in next to no time

Seriously, 3 pieces, 4 seams, they start to look like knickers in next to no time

Anyway, the pattern is nice, quick to make and great for using up scraps. (It would take a smidge longer with the bands I think, but still be a really fast make). The pattern pieces fit on 5 pages of A4 and once my printer printed them out properly they fit together easily. I loved the fact that the seam allowance was stated very clearly at the top of the instructions along with the info that it was already included in the pattern. (How many times have I had to search for that?) The drafting seemed good, it came together easily, things fit and the instructions were easy. The only thing I didn’t see was grainlines on the pattern pieces.

So, one new pair of pants for now, more to follow.

I only had a little piece left, which I showed to my friend when she came. And she pointed out it would make a great circular scarf / headband type thing. So, one quick seam (I left the edges to curl) and a quick snip to level it off later, and she went away with a new item of clothing too.

Bonus item for the woman with the cool ideas who also loves green and hot pink

Bonus item for the woman with the cool ideas who also loves green and hot pink

Is anyone else as obsessed as me at using up leftovers?

Stripes to the max

I used to buy my (really quite small back then) kids clothes from an online store called Nordic Kids. Well, I occasionally did, when they had a sale on. Lovely, bright, unisex, kids clothes (from Scandanavia). And then the store went bust 😦

Well, these days, I’m sewing some of their clothes. And I get my bright and cheery fix from splurging on fabric from Kitschy Coo (click on that link at your own risk). But it does mean that my kids can have bright cheery clothes again 🙂

She practised this pose in the mirror before coming outside for her photo shoot

She practised this pose in the mirror before coming outside for her photo shoot

The stripey t shirt dress I made her before has been getting a lot of use, so I thought she could use another one. Luckily for my bank balance the whole dress came out of a metre of fabric, phew.

yes, the colours are that vibrant in real life. (Looking at the selvage, they're woven not printed)

yes, the colours are that vibrant in real life. (Looking at the selvage, they’re woven not printed)

Without any white in this time (cos, you know, kids, mud, food, felt tip, etc).

Couldn't resist adding the obligatory tissue pocket "upside down"

Couldn’t resist adding the obligatory tissue pocket “upside down”

The main difference is no ribbing this time. Because the pink I had was close, but no cigar (in a so almost right that it was very wrong kind of way). So the neck is a little slouchy. But then, the rate she’s growing, I figure I can live with that.

Twin needle finish (look mum, no serger/coverstitch/fancy expensive machine in sight)

Twin needle finish (look mum, no serger/coverstitch/fancy expensive machine in sight)

Also I interfaced the pocket. Because it Was Not Playing Fair. So I’m extra annoyed at the wonky stitching caused by her brother running into the room and thrusting something into my face while I was sewing. Sigh.

Anyway, I’m pretty pleased with this one. Easy, quick, stylish, practical, bright, no major mishaps, the stripes match at the side. 9/10 I reckon.

This time, I have the eyes on the leftovers for myself…..

The Challenge – Part 4 (Over to you?)

I had such fun with this challenge (from inception through the idea stage through to a finished garment), used up lots of stash and ended up with something I would never have come up with on my own. It made me think it would make a great sewing swap idea. So I wondered, would anyone else like to play? If so, leave a comment (including how I can contact you) by the 22nd July (first day of my kids summer holidays) and if 2 or more people are up for it I’ll organise a swap. How it will work… First of find a little something from your stash that has definite potential but you haven’t found the right project for yet. It could be a fat quarter of amazing quilting cotton, or a set of buttons, some lace trim, a fancy zip, a remnant of amazing fabric from a previous make. No duds here, the aim is to inspire creativity and free a little something lovely but unused from your stash so it can make its own way in the world. This will be what you swap. When you receive your parcel, make your gift the star ingredient in something new for yourself, using only things already in your stash to augment it. (It’s up to you how strictly you interpret that rule, no one will judge if someone feels the need to buy matching thread or invest in a new pattern). So it’s a double win on the stashbusting front (you give something away and then use something up), plus you get a pressie in the post and a dose of unexpected inspiration. Anyone up for it? If so, leave a comment below including a method of contacting you (email address or blog page) and then I can work out how to organise the who swaps with who bit. Oh and I thought I’d call it Challenge Anya, if that’s ok with you guys. Partly in honour of the woman who came up with the idea when she gave me my gift, but mainly because it reminds me of that programme from my youth…

**************************************************************************************************

UPDATE: We’re on. So if you want in, let me know your details, either in comments below or via the new Facebook group.

Let me know by 22nd July, then I will send out swap partners and contact details so that people can exchange items by the beginning of August. There won’t be a deadline as such, but I’ll do a round up at the end of August (or maybe the beginning of September, cos, bank holidays and festivals!).

Challenge Anneka - There was an old woman who lived in a shoe ...

need I say more?

Challenge – Part 3 (the excecution).

So, I made a skirt!

woo hoo

woo hoo

Materials used: Corduroy, from stash. Black flowery polyester(?) stuff, from stash (no idea why I have this, think it might be from the Scrapstore). Zip – Curvy Sewing Collective Christmas swap present (thanks Katrin). Button (reminisent of toadstool cap from print) – part of a set my brother and sister in law got me for my birthday (thanks guys). Thread, from stash. Fungus print quilting cotton, turquoise bead, turquoise ribbon – all part of my Birthday Challenge present.

Pattern Base- Aztek Skirt from Ottobre 05/2012.

Size- my 97cm waist and 117cm hip measurement put me in the size 50.

Alterations:

Left off hip pockets – which was easy to do, I just used the pattern line intended for the lining.

pockets

pockets

Added patch pockets – I basically used the pocket facing piece (pattern piece number 6) but squared it off at the bottom. The pockets are double sided – one has the mushrooms going sideways on the inside cos a fat quarter really isn’t much fabric!

I got the grainline wrong, putting it parallel to the centre seams (if you look at the Ottobre pictures of it made up in the bold stripey and zig zag fabric you can easily see this is not what it should be by looking at the centre front seam).

Increased back darts after fitting to make them about 1cm wider each side of each dart at the top, tapering to the just below the intended point. I think I have a “sway back”. This decreased my the width of the skirt back by 4cm and it now fits much better.

fun guys

fun guys

Added a curved waistband using Heather’s excellent instructions.

waistband, button, beltloops and zip

waistband, button, beltloops and zip

I also added some belt loops, made from scraps of mushroom fabric.

Added bead detail

Added bead detail

Sewed the pretty glass bead from my pack above one of the patch pockets – the turquoise and yellow in the bead picks up those colours from the mushroom design.

lining and hanging loops

lining and hanging loops (from ribbon from the pack)

Omitted the facings – as I was adding a waistband.

Used a normal zip, not an invisible one, because that was what I had. (I’m no zip insertion expert, I fudged something, it seems to work ok, but I suspect it wouldn’t pass muster with Patrick and May).

obligatory awkward blogger pose

obligatory awkward blogger pose

Tapered the sides in to make it straighter and less A line. It fit just fine around my waist and hips but the rest stuck out funnily (sorry, no before photo). I think the heavy fabric is the main culprit but I wouldn’t be surprised if my off grainline cutting excacerbated this problem. Anyway, starting at the seamline on the hip I gently tapered it in – the seamline ended up about 2″ in by the bottom of the skirt (so I’ve lost about 8″ from around the hem). It still seems a bit big, but I’m going to see how it wears.

Lopped about 4″ off the hem. Partly it sits a bit lower because of the waistband. But the length was really wierd so I let hubby loose with some pins and then once I had a general idea of where it should be I retraced the hemline from the pattern pieces.

and the traditional larking about pose

and the traditional larking about pose (I’m holding a mushroom, in case you’re wondering)

Verdict, I wasn’t sure part way through, but I really like the end result. Tapering the sides in, making it straighter rather than A line, made a huge difference. (I wonder if the size smaller as as well as reducing the waist by about 4cm the waistband tapers in slightly further, I’ve loped width of it too and to be honest it still feels a bit large. Maybe the fabric just isn’t drapey enough?) I wasn’t sure what to do with this cord, its a bit of a boring colour to be honest, but the mushroom fabric tones so well with it and really adds some interest. I think it’s a real autumn skirt, the colour, the fungus, the thickness and I plan to wear it with thick tights and boots. (Although my 6 year old friend told me it was a kitchen skirt, as it has food on.)

some of my pretties, drying on the line (oh, and the new skirt)

some of my pretties, drying on the line (oh, and the new skirt)

I would never have thought to make a skirt like this, but I’m really pleased I have. What a great present, thanks guys! And two less pieces of fabric in my stash now (there’s not much left of either now).

Now, to think of something to do with the rest of the beads and some yellow ribbon! I’m thinking necklace, unless someone has better ideas?

Eating the mushroom, not  euphamism, I do like raw mushroom, but mainly I did it to see the look on my photographers face (he's quite mushroomphobic)

Eating the mushroom, not euphamism, I do like raw mushroom, but mainly I did it to see the look on my photographers face (he’s quite mushroomphobic)

The Challenge – Part 2 (The Idea)

So, how to complete my challenge and turn my lovely birthday present into something for me?

First thoughts? I cannot imagine something made from all of those elements. A fat quarter of quilting fabric is quite small! Maybe I could eek a hat out of it? Or find a “100 things to make with a fat quarter” list on the internet.

hmm, looking promising

hmm, looking promising

Then The Man (AKA Hubby) and The Best Mate stepped in and suggested the mushroom fabric should be pockets. The weight of the fabric said to me they would have to be pockets on a skirt or pair of trousers. Sticking to the spirit of the challenge (if not the letter), I poked around in my stash (which is a spiritual extension of my sewing box, although it would take a pretty big actual sewing box to fit all of it inside) and came up with some sagey green cord that I bought as part of a bulk package of bits of corduroy that someone was selling on facebook (what can I say, I was a maths post grad, I have a bit of a weakness for corduroy).

Sapling Skirt

Seasalt Sapling Skirt (image grabbed from the Seasalt webpage)

I got an idea in my head of a kind of Seasalt/White Stuff style skirt, with mushroom patch pockets, wanna see my sketch?

professional, not

professional, not

Next up, I had a look for a pattern. I don’t have a Tried and Tested skirt pattern as I don’t usually make skirts. I have made but two, both grainline moss minis. However, I do have a copy of Ottobre 5/2012 and the Aztek Velveteen Skirt (no. 12) looked promising.

Picture of Ottobre Aztek skirt (05/2012) from the Ottobre blog

So I set to work….

(yeah, I know, I’m being a tease. New post soon, promise, I just didn’t want this one getting too long and I have to go and pick various children up from several places now.)

The Challenge – Part 1

On Saturday (which coincidentally happened to be 4th July, which is just another day for most people here in the UK) there was a shindig to belatedly celebrate my recent birthday and rather more prematurely celebrate my friends upcoming one. (Our combined age by the end of this year will be 110). Food was eaten, drink was drunk, children ran around outside with bubbles and balloons and there was lots of ceilidh dancing with music from my favourite band. It was a fab night.

Eating and drinking

Eating and drinking

Playing outside

Playing outside

And cake (BTW I never intended to wear those 2 items together, but I completely forgot to plan what to wear and on the day it was the only clean skirt I had and the only top that would go with it. I kind of hope they looked like a dress but I rather feel they looked very mumsy. Oh well. The kids looked cute!)

And cake (BTW I never intended to wear those 2 items together, but I completely forgot to plan what to wear and on the day it was the only clean skirt I had and the only top that would go with it. I kind of hope they looked like a dress but I rather feel they looked very mumsy. Oh well. The kids looked cute!)

(There appear to be no pictures of the dancing so you’ll just have to take my word for it.)

I suppose I should’ve realised that some people might get me presents, but it honestly hadn’t crossed my mind (after all, everyone had brought food or drink to contribute). However, I did get a couple of small things, including this.

She didn't know me 20 years ago, but I may have mentioned that back in the day I liked to watch Ready Steady Cook (there was no Can't Sew, Won't Sew program, but there was Can't Cook, Won't Cook, I seem to recall)

She didn’t know me 20 years ago, but I may have mentioned that back in the day I liked to watch Ready Steady Cook (there was no Can’t Sew, Won’t Sew program, but there was Can’t Cook, Won’t Cook, I seem to recall)

Ah, what a lovely thought

Ah, what a lovely thought

My haul of goodies, a fat quarter of quilting cotton, 2 different colours of ribbon and lots of beads. Hmm, thinking caps on....

My haul of goodies, a fat quarter of quilting cotton, 2 different colours of ribbon and lots of beads. Hmm, thinking caps on….

Challenge accepted.

Watch this space….